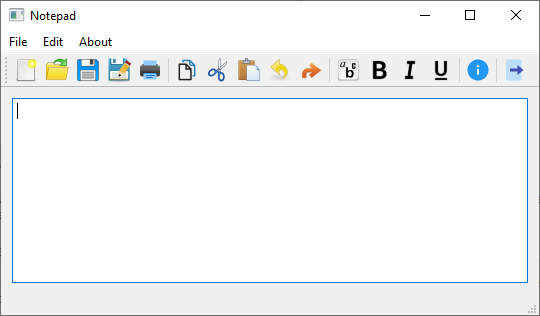
A tutorial for Qt Widgets based notepad application.
In this topic, we teach basic Qt knowledge by implementing a simple Notepad application using C++ and the Qt Widgets module. The application is a small text editor which allows you to create a text file, save it, print it, or reopen and edit it again. You can also set the font to be used.
要运行范例从 Qt Creator ,打开 Welcome 模式,然后选择范例从 Examples 。更多信息,拜访 构建和运行范例 .
Setting up a new project in Qt Creator is aided by a wizard that guides you step-by-step through the project creation process. The wizard prompts you to enter the settings needed for that particular type of project and creates the project for you.
注意: The UI text in Qt Creator and the contents of the generated files depend on the Qt Creator version that you use.
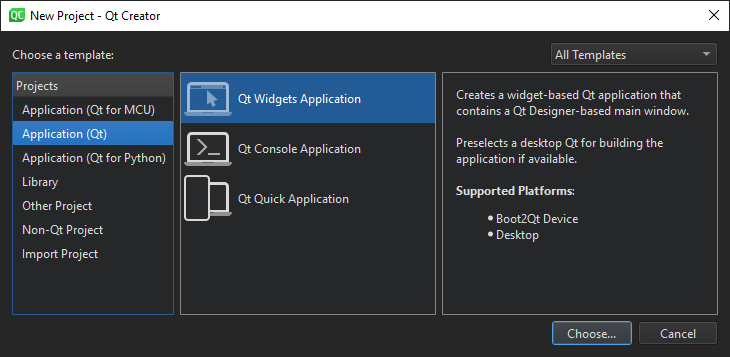
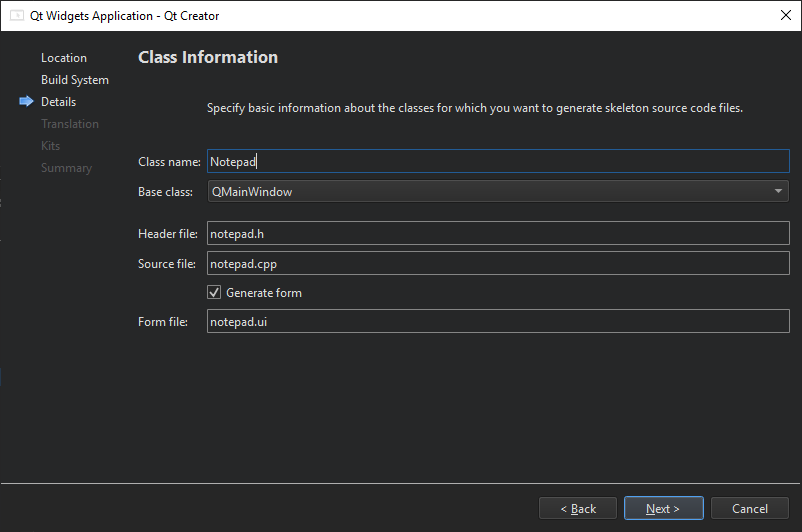
To create the Notepad project, select File > New Project > Application (Qt) > Qt Widgets Application > Choose , and follow the instructions of the wizard. In the Class Information dialog, type Notepad as the class name and select QMainWindow as the base class.
The Qt Widgets Application wizard creates a project that contains a main source file and a set of files that specify a user interface (Notepad widget):
The files come with the necessary boiler plate code for you to be able to build and run the project. We will take a closer look at the file contents in the following sections.
了解更多
| 关于 | Here |
|---|---|
| 使用 Qt Creator | Qt Creator |
| 采用 Qt Creator 创建其它类型的应用程序 | Qt Creator 教程 |
The wizard generates the following code in the main.cpp file:
#include "notepad.h"
#include <QApplication>
int main(int argc, char *argv[])
{
    QApplication a(argc, argv);
    Notepad w;
    w.show();
    return a.exec();
}
We will go through the code line by line. The following lines include the header files for the Notepad widget and QApplication . All Qt classes have a header file named after them.
#include "notepad.h"
#include <QApplication>
The following line defines the main function that is the entry point for all C and C++ based applications:
int main(int argc, char *argv[])
The following line creates a
QApplication
object. This object manages application-wide resources and is necessary to run any Qt program that uses Qt Widgets. It constructs an application object with
argc
command line arguments run in
argv
. (For GUI applications that do not use Qt Widgets, you can use
QGuiApplication
instead.)
QApplication a(argc, argv);
The following line creates the Notepad object. This is the object for which the wizard created the class and the UI file. The user interface contains visual elements that are called
widgets
in Qt. Examples of widgets are text edits, scroll bars, labels, and radio buttons. A widget can also be a container for other widgets; a dialog or a main application window, for example.
Notepad w;
The following line shows the Notepad widget on the screen in its own window. Widgets can also function as containers. An example of this is QMainWindow which often contains several types of widgets. Widgets are not visible by default; the function show () makes the widget visible.
w.show();
The following line makes the QApplication enter its event loop. When a Qt application is running, events are generated and sent to the widgets of the application. Examples of events are mouse presses and key strokes.
return a.exec();
了解更多
| 关于 | Here |
|---|---|
| Widget 和窗口几何体 | 窗口和对话框 Widget |
| 事件和事件处理 | 事件系统 |
The wizard generates a user interface definition in XML format: notepad.ui. When you open the notepad.ui file in Qt Creator, it automatically opens in the integrated Qt Designer.
When you build the application, Qt Creator launches the Qt uic (用户界面编译器) that reads the .ui file and creates a corresponding C++ header file, ui_notepad.h.
The wizard creates an application that uses a QMainWindow . It has its own layout to which you can add a menu bar, dock widgets, toolbars, and a status bar. The center area can be occupied by any kind of widget. The wizard places the Notepad widget there.
To add widgets in Qt Designer:
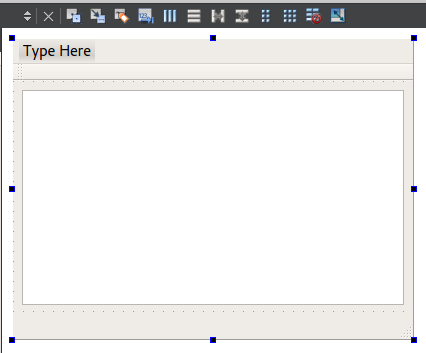
The UI now looks as follows in Qt Designer:
You can view the generated XML file in the code editor:
<?xml version="1.0" encoding="UTF-8"?>
<ui version="4.0">
 <class>Notepad</class>
 <widget class="QMainWindow" name="Notepad">
  <property name="geometry">
   <rect>
    <x>0</x>
    <y>0</y>
    <width>800</width>
    <height>400</height>
   </rect>
  </property>
  <property name="windowTitle">
   <string>Notepad</string>
  </property>
  <widget class="QWidget" name="centralWidget">
   <layout class="QVBoxLayout" name="verticalLayout">
    <item>
     <widget class="QTextEdit" name="textEdit"/>
    </item>
   </layout>
  </widget>
  <widget class="QMenuBar" name="menuBar">
    ...
The following line contains the XML declaration, which specifies the XML version and character encoding used in the document:
<?xml version="1.0" encoding="UTF-8"?>
The rest of the file specifies an
ui
element that defines a Notepad widget:
<ui version="4.0">
The UI file is used together with the header and source file of the Notepad class. We will look at the rest of the UI file in the later sections.
The wizard generated a header file for the Notepad class that has the necessary #includes, a constructor, a destructor, and the Ui object. The file looks as follows:
#include <QMainWindow>
QT_BEGIN_NAMESPACE
namespace Ui {
class Notepad;
}
QT_END_NAMESPACE
class Notepad : public QMainWindow
{
    Q_OBJECT
public:
    explicit Notepad(QWidget *parent = nullptr);
    ~Notepad();
private:
    Ui::Notepad *ui;
    QString currentFile;
};
The following line includes QMainWindow that provides a main application window:
#include <QMainWindow>
The following lines declare the Notepad class in the Ui namespace, which is the standard namespace for the UI classes generated from .ui files by the
uic
工具:
namespace Ui {
class Notepad;
}
The class declaration contains the
Q_OBJECT
macro. It must come first in the class definition, and declares our class as a
QObject
. Naturally, it must also inherit from
QObject
。
QObject
adds several abilities to a normal C++ class. Notably, the class name and slot names can be queried at runtime. It is also possible to query a slot's parameter types and invoke it.
class Notepad : public QMainWindow
{
    Q_OBJECT
The following lines declare a constructor that has a default argument called
parent
. The value 0 indicates that the widget has no parent (it is a top-level widget).
public:
    explicit Notepad(QWidget *parent = nullptr);
The following line declares a virtual destructor to free the resources that were acquired by the object during its life-cycle. According to the C++ naming convention, destructors have the same name as the class they are associated with, prefixed with a tilde (~). In QObject , destructors are virtual to ensure that the destructors of derived classes are invoked properly when an object is deleted through a pointer-to-base-class.
~Notepad();
The following lines declare a member variable which is a pointer to the Notepad UI class. A member variable is associated with a specific class, and accessible for all its methods.
private:
    Ui::Notepad *ui;
    QString currentFile;
};
The source file that the wizard generated for the Notepad class looks as follows:
#include "notepad.h"
#include "ui_notepad.h"
Notepad::Notepad(QWidget *parent) :
    QMainWindow(parent),
    ui(new Ui::Notepad)
{
    ui->setupUi(this);
}
The following lines include the Notepad class header file that was generated by the wizard and the UI header file that was generated by the
uic
工具:
#include "notepad.h"
#include "ui_notepad.h"
The following line defines the
Notepad
构造函数:
Notepad::Notepad(QWidget *parent) :
The following line calls the QMainWindow constructor, which is the base class for the Notepad class:
QMainWindow(parent),
The following line creates the UI class instance and assigns it to the
ui
member:
ui(new Ui::Notepad)
The following line sets up the UI:
{
    ui->setupUi(this);
In the destructor, we delete the
ui
:
Notepad::~Notepad()
{
    delete ui;
}
The wizard generates the following project file,
CMakeLists.txt
, for us:
# Copyright (C) 2022 The Qt Company Ltd.
# SPDX-License-Identifier: BSD-3-Clause
cmake_minimum_required(VERSION 3.16)
project(notepad LANGUAGES CXX)
if(NOT DEFINED INSTALL_EXAMPLESDIR)
    set(INSTALL_EXAMPLESDIR "examples")
endif()
set(INSTALL_EXAMPLEDIR "${INSTALL_EXAMPLESDIR}/widgets/tutorials/notepad")
find_package(Qt6
    REQUIRED COMPONENTS Core Gui Widgets
    OPTIONAL_COMPONENTS PrintSupport
)
qt_standard_project_setup()
qt_add_executable(notepad
    main.cpp
    notepad.cpp notepad.h notepad.ui
)
set_target_properties(notepad PROPERTIES
    WIN32_EXECUTABLE TRUE
    MACOSX_BUNDLE TRUE
)
target_link_libraries(notepad PRIVATE
    Qt6::Core
    Qt6::Gui
    Qt6::Widgets
)
if(TARGET Qt6::PrintSupport)
    target_link_libraries(notepad PRIVATE Qt6::PrintSupport)
endif()
# Resources:
set(notepad_resource_files
    "images/bold.png"
    "images/copy.png"
    "images/create.png"
    "images/cut.png"
    "images/edit_redo.png"
    "images/edit_undo.png"
    "images/exit.png"
    "images/font.png"
    "images/info.png"
    "images/italic.png"
    "images/new.png"
    "images/open.png"
    "images/paste.png"
    "images/pencil.png"
    "images/print.png"
    "images/save.png"
    "images/save_as.png"
    "images/underline.png"
)
qt_add_resources(notepad "notepad"
    PREFIX
        "/"
    FILES
        ${notepad_resource_files}
)
install(TARGETS notepad
    RUNTIME DESTINATION "${INSTALL_EXAMPLEDIR}"
    BUNDLE DESTINATION "${INSTALL_EXAMPLEDIR}"
    LIBRARY DESTINATION "${INSTALL_EXAMPLEDIR}"
)
The project file specifies the source, header, and UI files included in the project.
了解更多
| 关于 | Here |
|---|---|
| 使用 Qt Designer | Qt Designer 手册 |
| 布局 | 布局管理 , Widget 和布局 , 布局范例 |
| The widgets that come with Qt | Qt Widget 画廊 |
| Main windows and main window classes | 应用程序主窗口 , 主窗口范例 |
| QObjects and the Qt Object model (This is essential to understand Qt) | 对象模型 |
| qmake and the Qt build system | qmake 手册 |
To add functionality to the editor, we start by adding menu items and buttons on a toolbar.
Click on "Type Here", and add the options New, Open, Save, Save as, Print and Exit. This creates 5 lines in the Action Editor below. To connect the actions to slots, right-click an action and select Go to slot > triggered() , and complete the code for that given slot.
If we also want to add the actions to a toolbar, we can assign an icon to each QAction , and then drag the QAction to the toolbar. You assign an icon by entering an icon name in the Icon property of the action concerned. When the QAction has been dragged to the toolbar, clicking the icon will launch the associated slot.
Complete the method
newDocument()
:
void Notepad::newDocument()
{
    currentFile.clear();
    ui->textEdit->setText(QString());
}
The
currentFile
variable is a global variable containing the file presently being edited, and
clear()
clears the text buffer. The
currentFile
variable is defined in the private part of notepad.h:
private:
    Ui::Notepad *ui;
    QString currentFile;
在
notepad.ui
, right click on
actionOpen
并选择
Go to Slot
.
Complete method
open()
.
void Notepad::open()
{
    QString fileName = QFileDialog::getOpenFileName(this, "Open the file");
    if (fileName.isEmpty())
        return;
    QFile file(fileName);
    currentFile = fileName;
    if (!file.open(QIODevice::ReadOnly | QFile::Text)) {
        QMessageBox::warning(this, "Warning", "Cannot open file: " + file.errorString());
        return;
    }
    setWindowTitle(fileName);
    QTextStream in(&file);
    QString text = in.readAll();
    ui->textEdit->setText(text);
    file.close();
}
QFileDialog::getOpenFileName
opens a dialog enabling you to select a file.
QFile
object
myfile
has the selected
file_name
as parameter. We store the selected file also into the global variable
currentFile
for later purposes. We open the file with
file.open
as a readonly text file. If it cannot be opened, a warning is issued, and the program stops.
We define a
QTextStream
instream
for parameter
myfile
. The contents of file
myfile
is copied into
QString
text
.
setText(text)
fills the buffer of our editor with
text
.
We create the method for saving a file in the same way as for
打开文件
, by right clicking on
actionSave
, and selecting
Go to Slot
.
void Notepad::save()
{
    QString fileName;
    // If we don't have a filename from before, get one.
    if (currentFile.isEmpty()) {
        fileName = QFileDialog::getSaveFileName(this, "Save");
        if (fileName.isEmpty())
            return;
        currentFile = fileName;
    } else {
        fileName = currentFile;
    }
    QFile file(fileName);
    if (!file.open(QIODevice::WriteOnly | QFile::Text)) {
        QMessageBox::warning(this, "Warning", "Cannot save file: " + file.errorString());
        return;
    }
    setWindowTitle(fileName);
    QTextStream out(&file);
    QString text = ui->textEdit->toPlainText();
    out << text;
    file.close();
}
QFile
object
myfile
is linked to global variable
current_file
, the variable that contains the file we were working with. If we cannot open
myfile
, an error message is issued and the method stops. We create a
QTextStream
outstream
. The contents of the editor buffer is converted to plain text, and then written to
outstream
.
void Notepad::saveAs()
{
    QString fileName = QFileDialog::getSaveFileName(this, "Save as");
    if (fileName.isEmpty())
        return;
    QFile file(fileName);
    if (!file.open(QFile::WriteOnly | QFile::Text)) {
        QMessageBox::warning(this, "Warning", "Cannot save file: " + file.errorString());
        return;
    }
    currentFile = fileName;
    setWindowTitle(fileName);
    QTextStream out(&file);
    QString text = ui->textEdit->toPlainText();
    out << text;
    file.close();
}
This is the same procedure as for Saving a file , the only difference being that here you need to enter a new file name for the file to be created.
If you want to use print functionalities, you need to add
PrintSupport
到工程文件:
find_package(Qt6
    REQUIRED COMPONENTS Core Gui Widgets
    OPTIONAL_COMPONENTS PrintSupport
)
在
notepad.cpp
, we declare a QPrinter object called
printDev
:
void Notepad::print()
{
#if defined(QT_PRINTSUPPORT_LIB) && QT_CONFIG(printer)
    QPrinter printDev;
#if QT_CONFIG(printdialog)
    QPrintDialog dialog(&printDev, this);
    if (dialog.exec() == QDialog::Rejected)
        return;
#endif // QT_CONFIG(printdialog)
    ui->textEdit->print(&printDev);
#endif // QT_CONFIG(printer)
}
We launch a printer dialog box and store the selected printer in object
printDev
. If we clicked on
Cancel
and did not select a printer, the methods returns. The actual printer command is given with
ui->textEdit->print
with our QPrinter object as parameter.
void Notepad::selectFont()
{
    bool fontSelected;
    QFont font = QFontDialog::getFont(&fontSelected, this);
    if (fontSelected)
        ui->textEdit->setFont(font);
}
We declare a boolean indicating if we did select a font with
QFontDialog
. If so, we set the font with
ui->textEdit->setFont(myfont)
.
If you select some text, and want to copy it to the clipboard, you call the appropriate method of
ui->textEdit
. The same counts for cut, paste, undo, and redo.
下表展示了要使用的方法名称。
| Task | 方法调用 |
|---|---|
| Copy | ui->textEdit->copy() |
| Cut | ui->textEdit->cut() |
| Paste | ui->textEdit->paste() |
| Undo | ui->textEdit->undo() |
| Redo | ui->textEdit->redo() |
了解更多
| 关于 | Here |
|---|---|
| 文件和 I/O 设备 | QFile , QIODevice |
| tr() 和国际化 | Qt Linguist 手册 , 编写翻译源代码 , Qt 国际化 |
To build an example application from the command line, create a build directory for it. Switch to the build directory and run
qt-cmake
to configure your project for building. If the project is configured successfully, the generated files enable you to build the project.
md <build_directory>
cd <build_directory>
<qt_installation_directory>\bin\qt-cmake -GNinja <source_directory>
<generator>
The commands create an executable in the build directory. The
CMake
tool reads the project file and produces instructions for how to build the application. The generator then uses the instructions to produce the executable binary.
For example, to build the Notepad example on Windows, when using Ninja as the generator, enter the following commands:
md notepad-build
cd notepad-build
C:\Qt\6.6.1\msvc2019_64\bin\qt-cmake -GNinja C:\Examples\notepad
ninja
If you do not use Ninja as the generator, use the generator-independent CMake command to build the application instead of
ninja
:
cmake --build