This page aims to provide an easily discoverable, useful reference that shows the simplest and best way of performing specific tasks in Qt Quick. Each solution provides QML and/or C++ code snippets where applicable, and every snippet is automatically tested by Qt to ensure they remain functional.
How do I:
Assuming that the C++ type should be globally available to the QML files in the application, the simplest way is to make it a QML singleton with
QML_SINGLETON
. For example, in the header file,
backend.h
:
#include <QObject>
#include <QQmlEngine>
class Backend : public QObject
{
    Q_OBJECT
    QML_ELEMENT
    QML_SINGLETON
public:
    Q_INVOKABLE void doStuff();
};
backend.cpp
:
#include "backend.h"
#include <QDebug>
void Backend::doStuff()
{
    qDebug() << "Did stuff!";
}
You can then call that function from any QML file:
import QtQuick.Controls
import MyModule
ApplicationWindow {
    width: 400
    height: 400
    title: qsTr("C++ Button example")
    Button {
        text: qsTr("Click me")
        onClicked: Backend.doStuff()
    }
}
If the C++ type only needs to be available to a small set of QML files, consider using QML_ELEMENT . For more ways of exposing C++ types to QML, see Choosing the Correct Integration Method Between C++ and QML .
This example assumes that the
Backend
type is available in a QML module. With CMake, this is done via
qt_add_qml_module
. For an example that demonstrates this in detail, see
构建 QML 应用程序
.
Write a property change signal handler for the window's activeFocusItem 特性:
import QtQuick
import QtQuick.Controls
ApplicationWindow {
    width: 400
    height: 400
    visible: true
    title: qsTr("Active focus debugging example")
    onActiveFocusItemChanged: print("activeFocusItem: " + activeFocusItem)
    Row {
        TextField {
            objectName: "textField1"
        }
        TextField {
            objectName: "textField2"
        }
    }
}
This will print the item which currently has active focus to the console. To ensure that the output is useful, give each item a descriptive objectName .
We've prepared an example that consists of a few QML files which demonstrate how to do this. They can be used in your application in the following manner:
import QtQuick
import QtQuick.Layouts
import QtQuick.Controls.Material
ApplicationWindow {
    id: window
    width: 600
    height: 600
    visible: true
    title: qsTr("Time Picker Example")
    Material.theme: darkThemeSwitch.checked ? Material.Dark : Material.Light
    // Shows the selected time and opens the dialog.
    TimeComponentLabel {
        id: openDialogLabel
        width: parent.width - 80
        anchors.centerIn: parent
        font.pixelSize: Qt.application.font.pixelSize * 8
        renderTypeQuality: Text.VeryHighRenderTypeQuality
        interactive: !timePickerDialog.opened
        text: Qt.formatTime(new Date(1970, 1, 1, timePickerDialog.hours, timePickerDialog.minutes), "hh:mm")
        onTapped: timePickerDialog.openWithMode(TimePicker.Mode.Hours)
    }
    ColumnLayout {
        // We always want the openDialogLabel to be centered in the window, not us.
        // For that reason, we use anchors rather than putting the root items into a ColumnLayout.
        anchors.horizontalCenter: parent.horizontalCenter
        anchors.top: openDialogLabel.bottom
        anchors.topMargin: 24
        spacing: 12
        Switch {
            id: is24HourSwitch
            text: qsTr("24 Hour")
            checked: timePickerDialog.is24Hour
        }
        Switch {
            id: darkThemeSwitch
            text: qsTr("Dark")
        }
    }
    TimePickerDialog {
        id: timePickerDialog
        anchors.centerIn: parent
        is24Hour: is24HourSwitch.checked
        onTimeAccepted: print("A time was chosen - do something here!")
    }
}
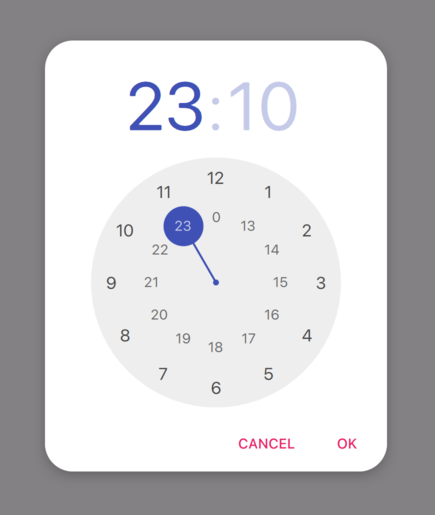
TimePickerDialog in its light theme. |
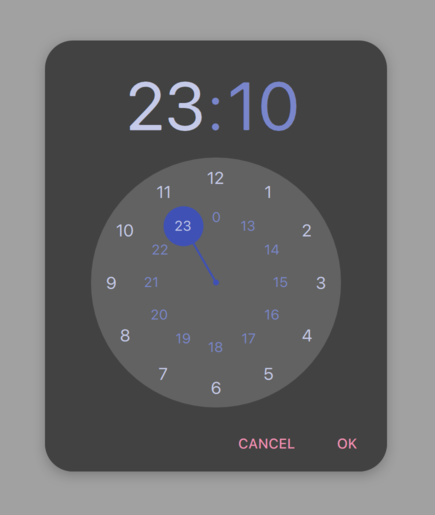
TimePickerDialog in its dark theme. |
To expose a C++ enum to JavaScript (that is, QJSEngine , not QQmlEngine or QQmlApplicationEngine ), use QJSEngine::newQMetaObject ():
    QJSEngine engine;
    engine.installExtensions(QJSEngine::AllExtensions);
    QJSValue backendJsMetaObject = engine.newQMetaObject(&Backend::staticMetaObject);
    engine.globalObject().setProperty("Backend", backendJsMetaObject);
    Backend backend(&engine);
    const bool loaded = backend.load();
The enum can then be used from JavaScript:
export function backendStatusUpdate(backendStatus) {
    if (backendStatus === Backend.Error) {
        console.warn("Error!")
        return
    }
    console.log("Backend loaded successfully")
}
当使用 QQmlEngine or QQmlApplicationEngine , there are easier options; see Choosing the Correct Integration Method Between C++ and QML 了解更多信息。
backend.h
:
#include <QObject>
#include <QJSEngine>
class Backend : public QObject
{
    Q_OBJECT
public:
    Backend(QJSEngine *engine);
    enum Status {
        Unknown,
        Error,
        Loading,
        Loaded
    };
    Q_ENUM(Status)
    bool load();
private:
    QJSEngine *mEngine = nullptr;
};
backend.cpp
:
#include "backend.h"
Backend::Backend(QJSEngine *engine) :
    mEngine(engine)
{
}
bool Backend::load()
{
    // Do some loading here...
    const QJSValue module = mEngine->importModule(":/script.mjs");
    if (module.isError()) {
        qWarning() << "Error loading script.mjs:" << module.toString();
        return false;
    }
    const QJSValue function = module.property("backendStatusUpdate");
    if (!function.isCallable()) {
        qWarning() << "backendStatusUpdate script function is not callable!";
        return false;
    }
    const QJSValue functionResult = function.call(QJSValueList() << Loaded);
    if (functionResult.isError()) {
        qWarning() << "backendStatusUpdate script function had errors:" << functionResult.toString();
        return false;
    }
    return true;
}
更多信息,见 QObject 集成 .