The Mandelbrot example demonstrates multi-thread programming using Qt. It shows how to use a worker thread to perform heavy computations without blocking the main thread's event loop.
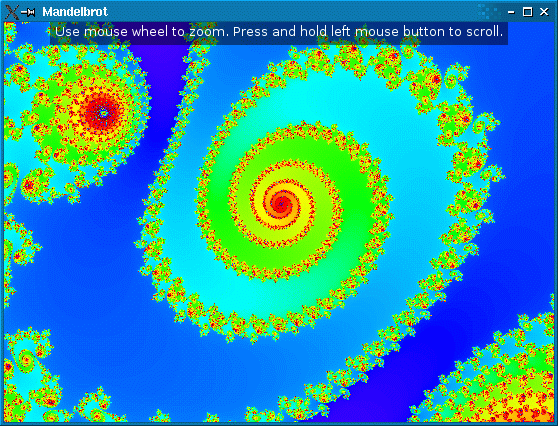
The heavy computation here is the Mandelbrot set, probably the world's most famous fractal. These days, while sophisticated programs, such as XaoS , provide real-time zooming in the Mandelbrot set, the standard Mandelbrot algorithm is just slow enough for our purposes.
In real life, the approach described here is applicable to a large set of problems, including synchronous network I/O and database access, where the user interface must remain responsive while some heavy operation is taking place. The 阻塞 Fortune 客户端 example shows the same principle at work in a TCP client.
The Mandelbrot application supports zooming and scrolling using the mouse or the keyboard. To avoid freezing the main thread's event loop (and, as a consequence, the application's user interface), we put all the fractal computation in a separate worker thread. The thread emits a signal when it is done rendering the fractal.
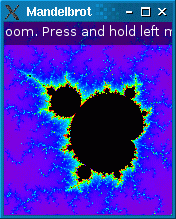
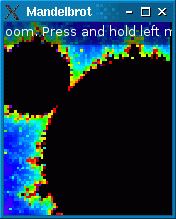
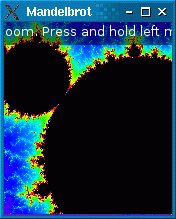
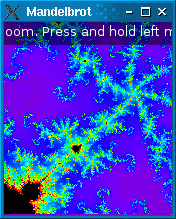
During the time where the worker thread is recomputing the fractal to reflect the new zoom factor position, the main thread simply scales the previously rendered pixmap to provide immediate feedback. The result doesn't look as good as what the worker thread eventually ends up providing, but at least it makes the application more responsive. The sequence of screenshots below shows the original image, the scaled image, and the rerendered image.
|
|
|
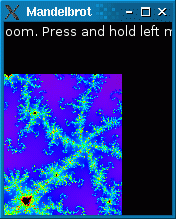
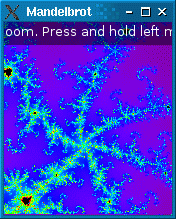
Similarly, when the user scrolls, the previous pixmap is scrolled immediately, revealing unpainted areas beyond the edge of the pixmap, while the image is rendered by the worker thread.
|
|
|
应用程序由 2 个类组成:
RenderThread
是
QThread
subclass that renders the Mandelbrot set.
MandelbrotWidget
是
QWidget
subclass that shows the Mandelbrot set on screen and lets the user zoom and scroll.
If you are not already familiar with Qt's thread support, we recommend that you start by reading the Qt 中的线程支持 概述。
我们开始从定义
RenderThread
类:
class RenderThread : public QThread
{
    Q_OBJECT
public:
    RenderThread(QObject *parent = nullptr);
    ~RenderThread();
    void render(double centerX, double centerY, double scaleFactor, QSize resultSize,
                double devicePixelRatio);
    static void setNumPasses(int n) { numPasses = n; }
    static QString infoKey() { return QStringLiteral("info"); }
signals:
    void renderedImage(const QImage &image, double scaleFactor);
protected:
    void run() override;
private:
    static uint rgbFromWaveLength(double wave);
    QMutex mutex;
    QWaitCondition condition;
    double centerX;
    double centerY;
    double scaleFactor;
    double devicePixelRatio;
    QSize resultSize;
    static int numPasses;
    bool restart = false;
    bool abort = false;
    static constexpr int ColormapSize = 512;
    uint colormap[ColormapSize];
};
类继承
QThread
so that it gains the ability to run in a separate thread. Apart from the constructor and destructor,
render()
is the only public function. Whenever the thread is done rendering an image, it emits the
renderedImage()
信号。
The protected
run()
function is reimplemented from
QThread
. It is automatically called when the thread is started.
在
private
章节,我们有
QMutex
,
QWaitCondition
, and a few other data members. The mutex protects the other data member.
RenderThread::RenderThread(QObject *parent)
    : QThread(parent)
{
    for (int i = 0; i < ColormapSize; ++i)
        colormap[i] = rgbFromWaveLength(380.0 + (i * 400.0 / ColormapSize));
}
In the constructor, we initialize the
restart
and
abort
变量到
false
. These variables control the flow of the
run()
函数。
We also initialize the
colormap
array, which contains a series of RGB colors.
RenderThread::~RenderThread()
{
    mutex.lock();
    abort = true;
    condition.wakeOne();
    mutex.unlock();
    wait();
}
The destructor can be called at any point while the thread is active. We set
abort
to
true
to tell
run()
to stop running as soon as possible. We also call
QWaitCondition::wakeOne
() to wake up the thread if it's sleeping. (As we will see when we review
run()
, the thread is put to sleep when it has nothing to do.)
The important thing to notice here is that
run()
is executed in its own thread (the worker thread), whereas the
RenderThread
constructor and destructor (as well as the
render()
function) are called by the thread that created the worker thread. Therefore, we need a mutex to protect accesses to the
abort
and
条件
variables, which might be accessed at any time by
run()
.
At the end of the destructor, we call
QThread::wait
() to wait until
run()
has exited before the base class destructor is invoked.
void RenderThread::render(double centerX, double centerY, double scaleFactor,
                          QSize resultSize, double devicePixelRatio)
{
    QMutexLocker locker(&mutex);
    this->centerX = centerX;
    this->centerY = centerY;
    this->scaleFactor = scaleFactor;
    this->devicePixelRatio = devicePixelRatio;
    this->resultSize = resultSize;
    if (!isRunning()) {
        start(LowPriority);
    } else {
        restart = true;
        condition.wakeOne();
    }
}
The
render()
function is called by the
MandelbrotWidget
whenever it needs to generate a new image of the Mandelbrot set. The
centerX
,
centerY
,和
scaleFactor
parameters specify the portion of the fractal to render;
resultSize
specifies the size of the resulting
QImage
.
The function stores the parameters in member variables. If the thread isn't already running, it starts it; otherwise, it sets
restart
to
true
(telling
run()
to stop any unfinished computation and start again with the new parameters) and wakes up the thread, which might be sleeping.
void RenderThread::run()
{
    QElapsedTimer timer;
    forever {
        mutex.lock();
        const double devicePixelRatio = this->devicePixelRatio;
        const QSize resultSize = this->resultSize * devicePixelRatio;
        const double requestedScaleFactor = this->scaleFactor;
        const double scaleFactor = requestedScaleFactor / devicePixelRatio;
        const double centerX = this->centerX;
        const double centerY = this->centerY;
        mutex.unlock();
run()
is quite a big function, so we'll break it down into parts.
The function body is an infinite loop which starts by storing the rendering parameters in local variables. As usual, we protect accesses to the member variables using the class's mutex. Storing the member variables in local variables allows us to minimize the amount of code that needs to be protected by a mutex. This ensures that the main thread will never have to block for too long when it needs to access
RenderThread
's member variables (e.g., in
render()
).
The
forever
keyword is a Qt pseudo-keyword.
        const int halfWidth = resultSize.width() / 2;
        const int halfHeight = resultSize.height() / 2;
        QImage image(resultSize, QImage::Format_RGB32);
        image.setDevicePixelRatio(devicePixelRatio);
        int pass = 0;
        while (pass < numPasses) {
            const int MaxIterations = (1 << (2 * pass + 6)) + 32;
            constexpr int Limit = 4;
            bool allBlack = true;
            timer.restart();
            for (int y = -halfHeight; y < halfHeight; ++y) {
                if (restart)
                    break;
                if (abort)
                    return;
                auto scanLine =
                        reinterpret_cast<uint *>(image.scanLine(y + halfHeight));
                const double ay = centerY + (y * scaleFactor);
                for (int x = -halfWidth; x < halfWidth; ++x) {
                    const double ax = centerX + (x * scaleFactor);
                    double a1 = ax;
                    double b1 = ay;
                    int numIterations = 0;
                    do {
                        ++numIterations;
                        const double a2 = (a1 * a1) - (b1 * b1) + ax;
                        const double b2 = (2 * a1 * b1) + ay;
                        if ((a2 * a2) + (b2 * b2) > Limit)
                            break;
                        ++numIterations;
                        a1 = (a2 * a2) - (b2 * b2) + ax;
                        b1 = (2 * a2 * b2) + ay;
                        if ((a1 * a1) + (b1 * b1) > Limit)
                            break;
                    } while (numIterations < MaxIterations);
                    if (numIterations < MaxIterations) {
                        *scanLine++ = colormap[numIterations % ColormapSize];
                        allBlack = false;
                    } else {
                        *scanLine++ = qRgb(0, 0, 0);
                    }
                }
            }
            if (allBlack && pass == 0) {
                pass = 4;
            } else {
                if (!restart) {
                    QString message;
                    QTextStream str(&message);
                    str << " Pass " << (pass + 1) << '/' << numPasses
                        << ", max iterations: " << MaxIterations << ", time: ";
                    const auto elapsed = timer.elapsed();
                    if (elapsed > 2000)
                        str << (elapsed / 1000) << 's';
                    else
                        str << elapsed << "ms";
                    image.setText(infoKey(), message);
                    emit renderedImage(image, requestedScaleFactor);
                }
                ++pass;
            }
        }
Then comes the core of the algorithm. Instead of trying to create a perfect Mandelbrot set image, we do multiple passes and generate more and more precise (and computationally expensive) approximations of the fractal.
We create a high resolution pixmap by applying the device pixel ratio to the target size (see 绘制高分辨率版本的像素图和图像 ).
If we discover inside the loop that
restart
has been set to
true
(by
render()
), we break out of the loop immediately, so that the control quickly returns to the very top of the outer loop (the
forever
loop) and we fetch the new rendering parameters. Similarly, if we discover that
abort
has been set to
true
(by the
RenderThread
destructor), we return from the function immediately, terminating the thread.
The core algorithm is beyond the scope of this tutorial.
        mutex.lock();
        if (!restart)
            condition.wait(&mutex);
        restart = false;
        mutex.unlock();
    }
}
Once we're done with all the iterations, we call
QWaitCondition::wait
() to put the thread to sleep, unless
restart
is
true
. There's no use in keeping a worker thread looping indefinitely while there's nothing to do.
uint RenderThread::rgbFromWaveLength(double wave)
{
    double r = 0;
    double g = 0;
    double b = 0;
    if (wave >= 380.0 && wave <= 440.0) {
        r = -1.0 * (wave - 440.0) / (440.0 - 380.0);
        b = 1.0;
    } else if (wave >= 440.0 && wave <= 490.0) {
        g = (wave - 440.0) / (490.0 - 440.0);
        b = 1.0;
    } else if (wave >= 490.0 && wave <= 510.0) {
        g = 1.0;
        b = -1.0 * (wave - 510.0) / (510.0 - 490.0);
    } else if (wave >= 510.0 && wave <= 580.0) {
        r = (wave - 510.0) / (580.0 - 510.0);
        g = 1.0;
    } else if (wave >= 580.0 && wave <= 645.0) {
        r = 1.0;
        g = -1.0 * (wave - 645.0) / (645.0 - 580.0);
    } else if (wave >= 645.0 && wave <= 780.0) {
        r = 1.0;
    }
    double s = 1.0;
    if (wave > 700.0)
        s = 0.3 + 0.7 * (780.0 - wave) / (780.0 - 700.0);
    else if (wave <  420.0)
        s = 0.3 + 0.7 * (wave - 380.0) / (420.0 - 380.0);
    r = std::pow(r * s, 0.8);
    g = std::pow(g * s, 0.8);
    b = std::pow(b * s, 0.8);
    return qRgb(int(r * 255), int(g * 255), int(b * 255));
}
The
rgbFromWaveLength()
function is a helper function that converts a wave length to a RGB value compatible with 32-bit
QImage
s. It is called from the constructor to initialize the
colormap
array with pleasing colors.
The
MandelbrotWidget
类使用
RenderThread
to draw the Mandelbrot set on screen. Here's the class definition:
class MandelbrotWidget : public QWidget
{
    Q_DECLARE_TR_FUNCTIONS(MandelbrotWidget)
public:
    MandelbrotWidget(QWidget *parent = nullptr);
protected:
    QSize sizeHint() const override { return {1024, 768}; };
    void paintEvent(QPaintEvent *event) override;
    void resizeEvent(QResizeEvent *event) override;
    void keyPressEvent(QKeyEvent *event) override;
#if QT_CONFIG(wheelevent)
    void wheelEvent(QWheelEvent *event) override;
#endif
    void mousePressEvent(QMouseEvent *event) override;
    void mouseMoveEvent(QMouseEvent *event) override;
    void mouseReleaseEvent(QMouseEvent *event) override;
#ifndef QT_NO_GESTURES
    bool event(QEvent *event) override;
#endif
private:
    void updatePixmap(const QImage &image, double scaleFactor);
    void zoom(double zoomFactor);
    void scroll(int deltaX, int deltaY);
#ifndef QT_NO_GESTURES
    bool gestureEvent(QGestureEvent *event);
#endif
    RenderThread thread;
    QPixmap pixmap;
    QPoint pixmapOffset;
    QPoint lastDragPos;
    QString help;
    QString info;
    double centerX;
    double centerY;
    double pixmapScale;
    double curScale;
};
The widget reimplements many event handlers from
QWidget
. In addition, it has an
updatePixmap()
slot that we'll connect to the worker thread's
renderedImage()
signal to update the display whenever we receive new data from the thread.
Among the private variables, we have
thread
类型
RenderThread
and
pixmap
, which contains the last rendered image.
constexpr double DefaultCenterX = -0.637011;
constexpr double DefaultCenterY = -0.0395159;
constexpr double DefaultScale = 0.00403897;
constexpr double ZoomInFactor = 0.8;
constexpr double ZoomOutFactor = 1 / ZoomInFactor;
constexpr int ScrollStep = 20;
The implementation starts with a few constants that we'll need later on.
MandelbrotWidget::MandelbrotWidget(QWidget *parent) :
    QWidget(parent),
    centerX(DefaultCenterX),
    centerY(DefaultCenterY),
    pixmapScale(DefaultScale),
    curScale(DefaultScale)
{
    help = tr("Zoom with mouse wheel, +/- keys or pinch.  Scroll with arrow keys or by dragging.");
    connect(&thread, &RenderThread::renderedImage,
            this, &MandelbrotWidget::updatePixmap);
    setWindowTitle(tr("Mandelbrot"));
#if QT_CONFIG(cursor)
    setCursor(Qt::CrossCursor);
#endif
}
The interesting part of the constructor is the QObject::connect () 调用。
Although it looks like a standard signal-slot connection between two
QObject
s, because the signal is emitted in a different thread than the receiver lives in, the connection is effectively a
队列连接
. These connections are asynchronous (i.e., non-blocking), meaning that the slot will be called at some point after the
发射
statement. What's more, the slot will be invoked in the thread in which the receiver lives. Here, the signal is emitted in the worker thread, and the slot is executed in the GUI thread when control returns to the event loop.
With queued connections, Qt must store a copy of the arguments that were passed to the signal so that it can pass them to the slot later on. Qt knows how to take of copy of many C++ and Qt types, so, no further action is needed for QImage . If a custom type was used, a call to the template function qRegisterMetaType () would be required before the type could be used as a parameter in queued connections.
void MandelbrotWidget::paintEvent(QPaintEvent * /* event */)
{
    QPainter painter(this);
    painter.fillRect(rect(), Qt::black);
    if (pixmap.isNull()) {
        painter.setPen(Qt::white);
        painter.drawText(rect(), Qt::AlignCenter|Qt::TextWordWrap,
                         tr("Rendering initial image, please wait..."));
        return;
    }
在
paintEvent
(), we start by filling the background with black. If we have nothing to paint yet (
pixmap
is null), we display a message on the widget asking the user to be patient and return from the function immediately.
    if (qFuzzyCompare(curScale, pixmapScale)) {
        painter.drawPixmap(pixmapOffset, pixmap);
    } else {
        const auto previewPixmap = qFuzzyCompare(pixmap.devicePixelRatio(), qreal(1))
            ? pixmap
            : pixmap.scaled(pixmap.deviceIndependentSize().toSize(), Qt::KeepAspectRatio,
                            Qt::SmoothTransformation);
        const double scaleFactor = pixmapScale / curScale;
        const int newWidth = int(previewPixmap.width() * scaleFactor);
        const int newHeight = int(previewPixmap.height() * scaleFactor);
        const int newX = pixmapOffset.x() + (previewPixmap.width() - newWidth) / 2;
        const int newY = pixmapOffset.y() + (previewPixmap.height() - newHeight) / 2;
        painter.save();
        painter.translate(newX, newY);
        painter.scale(scaleFactor, scaleFactor);
        const QRectF exposed = painter.transform().inverted().mapRect(rect())
                                       .adjusted(-1, -1, 1, 1);
        painter.drawPixmap(exposed, previewPixmap, exposed);
        painter.restore();
    }
If the pixmap has the right scale factor, we draw the pixmap directly onto the widget.
Otherwise, we create a preview pixmap to be shown until the calculation finishes and translate the 坐标系 accordingly.
Since we are going to use transformations on the painter and use an overload of QPainter::drawPixmap () that does not support high resolution pixmaps in that case, we create a pixmap with device pixel ratio 1.
By reverse mapping the widget's rectangle using the scaled painter matrix, we also make sure that only the exposed areas of the pixmap are drawn. The calls to QPainter::save () 和 QPainter::restore () make sure that any painting performed afterwards uses the standard coordinate system.
    const QFontMetrics metrics = painter.fontMetrics();
    if (!info.isEmpty()){
        const int infoWidth = metrics.horizontalAdvance(info);
        const int infoHeight = (infoWidth/width() + 1) * (metrics.height() + 5);
        painter.setPen(Qt::NoPen);
        painter.setBrush(QColor(0, 0, 0, 127));
        painter.drawRect((width() - infoWidth) / 2 - 5, 0, infoWidth + 10, infoHeight);
        painter.setPen(Qt::white);
        painter.drawText(rect(), Qt::AlignHCenter|Qt::AlignTop|Qt::TextWordWrap, info);
    }
    const int helpWidth = metrics.horizontalAdvance(help);
    const int helpHeight = (helpWidth/width() + 1) * (metrics.height() + 5);
    painter.setPen(Qt::NoPen);
    painter.setBrush(QColor(0, 0, 0, 127));
    painter.drawRect((width() - helpWidth) / 2 - 5, height()-helpHeight, helpWidth + 10,
                     helpHeight);
    painter.setPen(Qt::white);
    painter.drawText(rect(), Qt::AlignHCenter|Qt::AlignBottom|Qt::TextWordWrap, help);
}
At the end of the paint event handler, we draw a text string and a semi-transparent rectangle on top of the fractal.
void MandelbrotWidget::resizeEvent(QResizeEvent * /* event */)
{
    thread.render(centerX, centerY, curScale, size(), devicePixelRatio());
}
Whenever the user resizes the widget, we call
render()
to start generating a new image, with the same
centerX
,
centerY
,和
curScale
parameters but with the new widget size.
Notice that we rely on
resizeEvent()
being automatically called by Qt when the widget is shown the first time to generate the initial image.
void MandelbrotWidget::keyPressEvent(QKeyEvent *event)
{
    switch (event->key()) {
    case Qt::Key_Plus:
        zoom(ZoomInFactor);
        break;
    case Qt::Key_Minus:
        zoom(ZoomOutFactor);
        break;
    case Qt::Key_Left:
        scroll(-ScrollStep, 0);
        break;
    case Qt::Key_Right:
        scroll(+ScrollStep, 0);
        break;
    case Qt::Key_Down:
        scroll(0, -ScrollStep);
        break;
    case Qt::Key_Up:
        scroll(0, +ScrollStep);
        break;
    case Qt::Key_Q:
        close();
        break;
    default:
        QWidget::keyPressEvent(event);
    }
}
The key press event handler provides a few keyboard bindings for the benefit of users who don't have a mouse. The
zoom()
and
scroll()
functions will be covered later.
void MandelbrotWidget::wheelEvent(QWheelEvent *event)
{
    const int numDegrees = event->angleDelta().y() / 8;
    const double numSteps = numDegrees / double(15);
    zoom(pow(ZoomInFactor, numSteps));
}
The wheel event handler is reimplemented to make the mouse wheel control the zoom level.
QWheelEvent::angleDelta
() returns the angle of the wheel mouse movement, in eighths of a degree. For most mice, one wheel step corresponds to 15 degrees. We find out how many mouse steps we have and determine the resulting zoom factor. For example, if we have two wheel steps in the positive direction (i.e., +30 degrees), the zoom factor becomes
ZoomInFactor
to the second power, i.e. 0.8 * 0.8 = 0.64.
void MandelbrotWidget::mousePressEvent(QMouseEvent *event)
{
    if (event->button() == Qt::LeftButton)
        lastDragPos = event->position().toPoint();
}
Pinch to zoom has been implemented with QGesture as outlined in Widget 和图形视图中的手势 .
#ifndef QT_NO_GESTURES
bool MandelbrotWidget::gestureEvent(QGestureEvent *event)
{
    if (auto *pinch = static_cast<QPinchGesture *>(event->gesture(Qt::PinchGesture))) {
        if (pinch->changeFlags().testFlag(QPinchGesture::ScaleFactorChanged))
            zoom(1.0 / pinch->scaleFactor());
        return true;
    }
    return false;
}
bool MandelbrotWidget::event(QEvent *event)
{
    if (event->type() == QEvent::Gesture)
        return gestureEvent(static_cast<QGestureEvent*>(event));
    return QWidget::event(event);
}
#endif
When the user presses the left mouse button, we store the mouse pointer position in
lastDragPos
.
void MandelbrotWidget::mouseMoveEvent(QMouseEvent *event)
{
    if (event->buttons() & Qt::LeftButton) {
        pixmapOffset += event->position().toPoint() - lastDragPos;
        lastDragPos = event->position().toPoint();
        update();
    }
}
When the user moves the mouse pointer while the left mouse button is pressed, we adjust
pixmapOffset
to paint the pixmap at a shifted position and call
QWidget::update
() to force a repaint.
void MandelbrotWidget::mouseReleaseEvent(QMouseEvent *event)
{
    if (event->button() == Qt::LeftButton) {
        pixmapOffset += event->position().toPoint() - lastDragPos;
        lastDragPos = QPoint();
        const auto pixmapSize = pixmap.deviceIndependentSize().toSize();
        const int deltaX = (width() - pixmapSize.width()) / 2 - pixmapOffset.x();
        const int deltaY = (height() - pixmapSize.height()) / 2 - pixmapOffset.y();
        scroll(deltaX, deltaY);
    }
}
When the left mouse button is released, we update
pixmapOffset
just like we did on a mouse move and we reset
lastDragPos
to a default value. Then, we call
scroll()
to render a new image for the new position. (Adjusting
pixmapOffset
isn't sufficient because areas revealed when dragging the pixmap are drawn in black.)
void MandelbrotWidget::updatePixmap(const QImage &image, double scaleFactor)
{
    if (!lastDragPos.isNull())
        return;
    info = image.text(RenderThread::infoKey());
    pixmap = QPixmap::fromImage(image);
    pixmapOffset = QPoint();
    lastDragPos = QPoint();
    pixmapScale = scaleFactor;
    update();
}
The
updatePixmap()
slot is invoked when the worker thread has finished rendering an image. We start by checking whether a drag is in effect and do nothing in that case. In the normal case, we store the image in
pixmap
and reinitialize some of the other members. At the end, we call
QWidget::update
() to refresh the display.
At this point, you might wonder why we use a
QImage
for the parameter and a
QPixmap
for the data member. Why not stick to one type? The reason is that
QImage
is the only class that supports direct pixel manipulation, which we need in the worker thread. On the other hand, before an image can be drawn on screen, it must be converted into a pixmap. It's better to do the conversion once and for all here, rather than in
paintEvent()
.
void MandelbrotWidget::zoom(double zoomFactor)
{
    curScale *= zoomFactor;
    update();
    thread.render(centerX, centerY, curScale, size(), devicePixelRatio());
}
在
zoom()
, we recompute
curScale
. Then we call
QWidget::update
() to draw a scaled pixmap, and we ask the worker thread to render a new image corresponding to the new
curScale
值。
void MandelbrotWidget::scroll(int deltaX, int deltaY)
{
    centerX += deltaX * curScale;
    centerY += deltaY * curScale;
    update();
    thread.render(centerX, centerY, curScale, size(), devicePixelRatio());
}
scroll()
类似于
zoom()
, except that the affected parameters are
centerX
and
centerY
.
The application's multithreaded nature has no impact on its
main()
function, which is as simple as usual:
int main(int argc, char *argv[])
{
    QApplication app(argc, argv);
    QCommandLineParser parser;
    parser.setApplicationDescription(u"Qt Mandelbrot Example"_s);
    parser.addHelpOption();
    parser.addVersionOption();
    QCommandLineOption passesOption(u"passes"_s, u"Number of passes (1-8)"_s, u"passes"_s);
    parser.addOption(passesOption);
    parser.process(app);
    if (parser.isSet(passesOption)) {
        const auto passesStr = parser.value(passesOption);
        bool ok;
        const int passes = passesStr.toInt(&ok);
        if (!ok || passes < 1 || passes > 8) {
            qWarning() << "Invalid value:" << passesStr;
            return -1;
        }
        RenderThread::setNumPasses(passes);
    }
    MandelbrotWidget widget;
    widget.grabGesture(Qt::PinchGesture);
    widget.show();
    return app.exec();
}