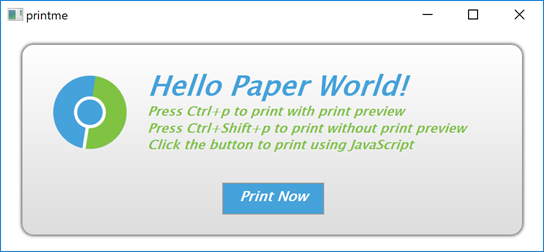
演示如何打印网页使用 Qt WebEngine Widgets.

PrintMe 演示如何使用 QWebEnginePage and QPrintDialog classes to print a web page. Further, it shows how to implement print preview by using the QPrintPreviewDialog class. For completeness, it also illustrates how to trigger a printing request within JavaScript.
要运行范例从 Qt Creator ,打开 Welcome 模式,然后选择范例从 Examples 。更多信息,拜访 构建和运行范例 .
In this example, we create an internal HTML page that is added as a resource collection file (.qrc). The page shows only a small HTML message box that explains how to trigger printing by using keyboard shortcuts or clicking a button. The button has the JavaScript
onclick
event attribute that calls the JavaScript
window.print()
函数。
<html lang="en">
   <head>
      <meta charset="utf-8">
      <title>PrintMe</title>
      <link rel="stylesheet" type="text/css" href="style.css">
      <script>
      function printNow() {
         window.print();
      }
      </script>
   </head>
   <body>
      <form class="form">
         <img class="logo" src="icon.svg" alt="qtwebengine">
         <div class="header">
            <h1>Hello Paper World!</h1>
            <h2>Press Ctrl+p to print with print preview</h2>
            <h2>Press Ctrl+Shift+p to print without print preview</h2>
            <h2>Click the button to print using JavaScript</h2>
            <p class="button" onclick="printNow()">Print Now</p>
      </form>
   </body>
</html>
在
main
function, we first instantiate a
QWebEngineView
and set the URL to our internal HTML page. Next, we create a
PrintHandler
instance and pass the requested page. For convenience, we also create keyboard shortcuts that can be used to call a print dialog or print preview dialog.
    QWebEngineView view;
    view.setUrl(QUrl(QStringLiteral("qrc:/index.html")));
    view.resize(1024, 750);
    view.show();
    PrintHandler handler;
    handler.setView(&view);
    auto printPreviewShortCut = new QShortcut(QKeySequence(Qt::CTRL | Qt::Key_P), &view);
    auto printShortCut = new QShortcut(QKeySequence(Qt::CTRL | Qt::SHIFT | Qt::Key_P), &view);
    QObject::connect(printPreviewShortCut, &QShortcut::activated, &handler, &PrintHandler::printPreview);
    QObject::connect(printShortCut, &QShortcut::activated, &handler, &PrintHandler::print);
在
PrintHandler
class, we first implement
printPreview()
, where we instantiate
QPrintPreviewDialog
. We need the
QPrintPreviewDialog::paintRequested
handle to generate a set of preview pages.
void PrintHandler::printPreview()
{
    if (!m_view)
        return;
    if (m_inPrintPreview)
        return;
    m_inPrintPreview = true;
    QPrintPreviewDialog preview(&m_printer, m_view);
    connect(&preview, &QPrintPreviewDialog::paintRequested,
            this, &PrintHandler::printDocument);
    preview.exec();
    m_inPrintPreview = false;
}
Now we can implement the
PrintHandler::printDocument()
slot, which is called in response to the
QPrintPreviewDialog::paintRequested
signal. To do actual painting on a printer, we call the
QWebEngineView::print
() function. Because this call is asynchronous, we need to use a local event loop. We begin the local event loop by calling
QEventLoop::exec
().
void PrintHandler::printDocument(QPrinter *printer)
{
    m_view->print(printer);
    m_waitForResult.exec();
}
To get notified about the result of printing job, we implement
PrintHandler::printFinished()
slot as handler of
QWebEngineView::printFinished
() signal. We check for
success
and report any errors that occurred.
void PrintHandler::printFinished(bool success)
{
    if (!success) {
        QPainter painter;
        if (painter.begin(&m_printer)) {
            QFont font = painter.font();
            font.setPixelSize(20);
            painter.setFont(font);
            painter.drawText(QPointF(10,25),
                             QStringLiteral("Could not generate print preview."));
            painter.end();
        }
    }
    m_waitForResult.quit();
}
The last function we implement,
PrintHandler::print()
, is trivial, because it simply opens
QPrintDialog
and calls the previously implemented
PrintHandler::printDocument()
.
void PrintHandler::print()
{
    QPrintDialog dialog(&m_printer, m_view);
    if (dialog.exec() != QDialog::Accepted)
        return;
    printDocument(&m_printer);
}