Qt for Android provides a complete solution to develop, build, and package your applications for Android. Most of these tasks, especially packaging and deployment are handled by Qt Creator providing rich developer experience.
Every time you run the application using Qt Creator, an Android Application Package (APK) is created and deployed onto the target of your choice (device or emulator). With a few minor changes to packaging settings, you can publish your application on Google Play.
The following instructions guide you to create an
.apk
or
.aab
that can go live on Google Play
Release Build
.
AndroidManifest.xml
which is the main file of concern here.
AndroidManifest.xml
:
见 Notes on Android project settings 了解更多信息。
.apk
file. You can create a new keystore if you do not have one. For more information, see
Specifying Settings for Packages in Qt Creator
.
.apk
package at:
<$BUILD_DIR>/android-build/build/outputs/apk/release/android-build-release.apk
注意:
In Qt Creator, select
Projects
>
Build
>
Build Steps
>
Build Android APK
>
Open package location after build
to build the application's
.apk
and open the directory containing the package.
.aab
file, then locate the package at:
<$BUILD_DIR>/android-build/build/outputs/bundle/release/android-build-release.aab
Log into the
Google Play Developer Console
and upload the
.aab
files, along with a description and screen captures resembling the usage of your application.
For Qt versions that support building a multi-abi bundle (i.e. Qt 5.14 and 5.15), uploading one
.aab
with all the supported architectures is enough. However, for Qt versions that don't have the multi-abi build support, publishing your app requires additional steps.
To publish your app that is built using a single ABI kit, you need to make sure that each ABI uses a different internal version code. The version code is an internal non-public identifier for your app's release. Build each one of the architectures you want to support and set a different version code for each ABI. This can be done as follows, for CMake:
set_property(TARGET scroll_example APPEND PROPERTY QT_ANDROID_VERSION_CODE <unique_version>)
Or as follows for qmake:
ANDROID_VERSION_CODE = <unique_version>
The app developer can use a specific scheme for the version code, for example, the code could have chunks for the platform, the ABI, and the actual version. Then, a sample scheme would be
<Platform><ABI><AppVersion>
:
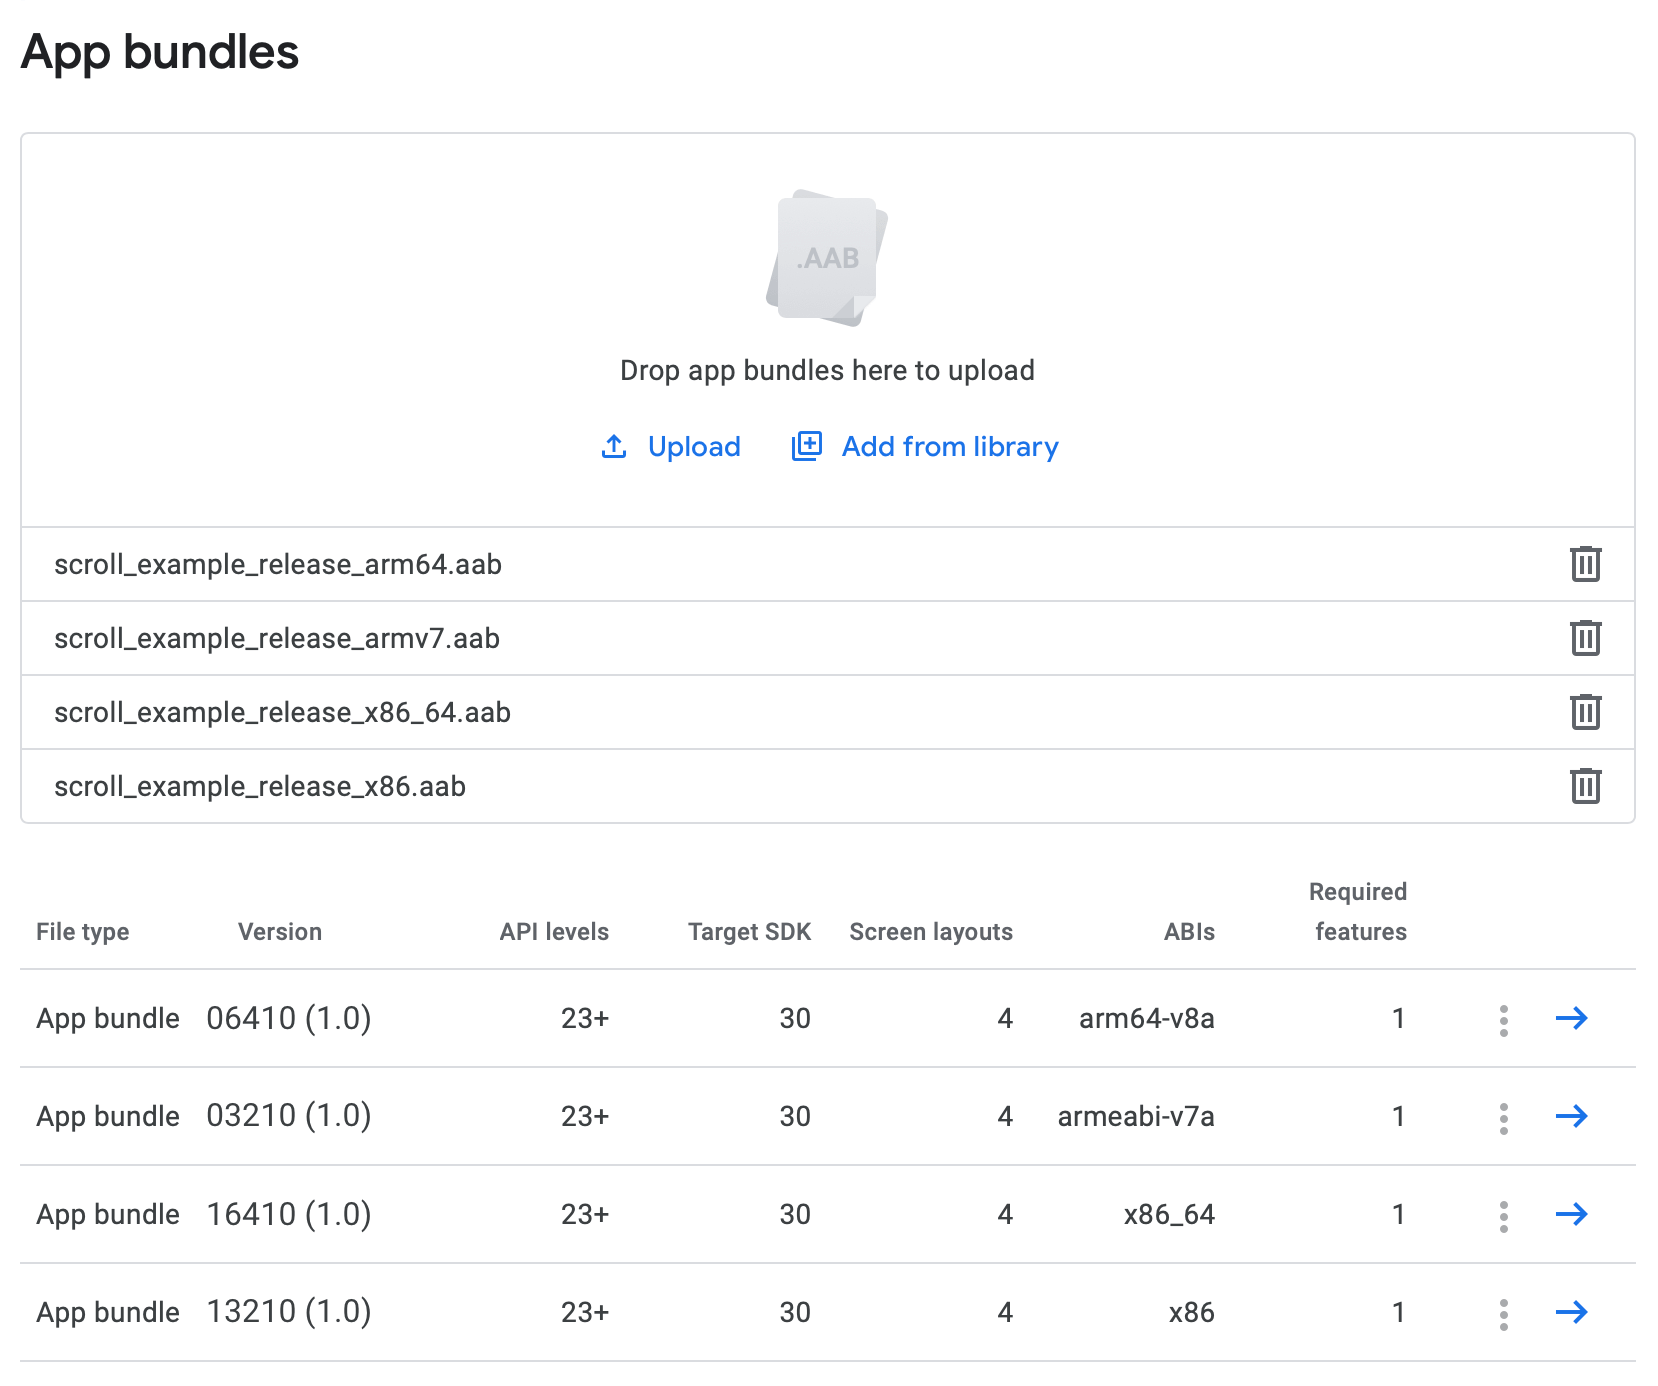
The resulting version code for a release 1.0 for arm64-v8a ABI, would be
06410
.
The following screenshot shows an example for an app targeting 4 ABIs, while each package uses a unique version code, which is different from the version name that is the public version string.

For more information on packaging, see 在 Android 部署应用程序 .
Settings for Minimum required SDK and Target SDK versions are set in the Gradle build configuration and are controlled by the following variables: For qmake:
For CMake:
见 CMake Property Reference for CMake projects, and qmake Variable Reference for Android-specific settings in qmake projects.
注意:
As before with Qt 5.15, you can specify these settings in
AndroidManifest.xml
. Be aware that
build.gradle
will override these if set there. See
Android: App Versioning
for more information on setting these in
build.gradle
.
注意:
By default, Qt adds the permissions and the features based on the module dependencies of your application. If you do not want these default permissions and features, either deselect the checkboxes
Include default permissions for Qt modules
and
Include default features for Qt modules
, or remove the following part from the
AndroidManifest.xml
文件:
<!-- The following comment will be replaced upon deployment with default permissions based on the dependencies of the application.
     Remove the comment if you do not require these default permissions. -->
<!-- %%INSERT_PERMISSIONS -->
<!-- The following comment will be replaced upon deployment with default features based on the dependencies of the application.
     Remove the comment if you do not require these default features. -->
<!-- %%INSERT_FEATURES -->
For information on the manifest, see Android: App Manifest and Qt Creator: Editing Manifest Files .