采用 Qt Quick 用户界面保护 CoAP 客户端并使用它。
Quick Secure CoAP Client demonstrates how to create a secure CoAP client and use it in a Qt Quick application.
注意: Qt CoAP does not provide a QML API in its current version. However, you can make the C++ classes of the module available to QML as it is shown in the example.
To run the example application, you first need to set up a secure CoAP server. You can run the example with any secure CoAP server supporting one of the pre-shared key (PSK) or certificate authentication modes. For more information about setting up a secure CoAP server, see 设置安全 CoAP 服务器 .
QmlCoapSecureClient
wraps the functionality of
QCoapClient
to make it available to QML. It also holds the selected security mode and security configuration parameters.
class QmlCoapSecureClient : public QObject
{
    Q_OBJECT
public:
    QmlCoapSecureClient(QObject *parent = nullptr);
    ~QmlCoapSecureClient() override;
    Q_INVOKABLE void setSecurityMode(QtCoap::SecurityMode mode);
    Q_INVOKABLE void sendGetRequest(const QString &host, const QString &path, int port);
    Q_INVOKABLE void setSecurityConfiguration(const QString &preSharedKey, const QString &identity);
    Q_INVOKABLE void setSecurityConfiguration(const QString &localCertificatePath,
                                              const QString &caCertificatePath,
                                              const QString &privateKeyPath);
    Q_INVOKABLE void disconnect();
Q_SIGNALS:
    void finished(const QString &result);
private:
    QCoapClient *m_coapClient;
    QCoapSecurityConfiguration m_configuration;
    QtCoap::SecurityMode m_securityMode;
};
In the main.cpp file, we register the
QmlCoapSecureClient
class as a QML type:
qmlRegisterType<QmlCoapSecureClient>("CoapSecureClient", 1, 0, "CoapSecureClient");
We also register the QtCoap namespace, to be able to use it in QML code:
    qmlRegisterUncreatableMetaObject(QtCoap::staticMetaObject, "qtcoap.example.namespace", 1, 0,
                                     "QtCoap", "Access to enums is read-only");
The instance of
QCoapClient
is created when the user selects or changes the security mode in the UI. The
QmlCoapSecureClient::setSecurityMode()
method is invoked from the QML code, when one of the security modes is selected:
        ButtonGroup {
            id: securityModeGroup
            onClicked: {
                if (securityModeGroup.checkedButton === preSharedMode)
                    client.setSecurityMode(QtCoap.SecurityMode.PreSharedKey);
                else
                    client.setSecurityMode(QtCoap.SecurityMode.Certificate);
            }
        }
和在
.cpp
文件:
void QmlCoapSecureClient::setSecurityMode(QtCoap::SecurityMode mode)
{
    // Create a new client, if the security mode has changed
    if (m_coapClient && mode != m_securityMode) {
        delete m_coapClient;
        m_coapClient = nullptr;
    }
    if (!m_coapClient) {
        m_coapClient = new QCoapClient(mode);
        m_securityMode = mode;
    ...
Then we connect the signals of the client, to get notified when a CoAP reply is received or a request has failed:
    ...
        connect(m_coapClient, &QCoapClient::finished, this,
                [this](QCoapReply *reply) {
                    if (!reply)
                        emit finished("Something went wrong, received a null reply");
                    else if (reply->errorReceived() != QtCoap::Error::Ok)
                        emit finished(errorMessage(reply->errorReceived()));
                    else
                        emit finished(reply->message().payload());
                });
        connect(m_coapClient, &QCoapClient::error, this,
                [this](QCoapReply *, QtCoap::Error errorCode) {
                    emit finished(errorMessage(errorCode));
                });
    ...
QmlCoapSecureClient::finished()
信号触发
onFinished
signal handler of
CoapSecureClient
, which handles the output:
    CoapSecureClient {
        id: client
        onFinished: {
            outputView.text = result;
            statusLabel.text = "";
            disconnectButton.enabled = true;
        }
    }
    ...
When the user clicks on the
Send Request
button, we set the security configuration based on the selected security mode and send a
GET
请求:
    ...
        Button {
            id: requestButton
            text: qsTr("Send Request")
            enabled: securityModeGroup.checkState !== Qt.Unchecked
            onClicked: {
                outputView.text = "";
                if (securityModeGroup.checkedButton === preSharedMode)
                    client.setSecurityConfiguration(pskField.text, identityField.text);
                else
                    client.setSecurityConfiguration(localCertificatePicker.selectedFile,
                                                    caCertificatePicker.selectedFile,
                                                    privateKeyPicker.selectedFile);
                client.sendGetRequest(hostComboBox.editText, resourceField.text,
    ...
There are two overloads for the
setSecurityConfiguration
method. For the PSK mode we simply set the client identity and the pre-shared key:
QmlCoapSecureClient::setSecurityConfiguration(const QString &preSharedKey, const QString &identity)
{
    QCoapSecurityConfiguration configuration;
    configuration.setPreSharedKey(preSharedKey.toUtf8());
    configuration.setPreSharedKeyIdentity(identity.toUtf8());
    m_configuration = configuration;
}
And for X.509 certificates, we read the certificate files and the private key, and set the security configuration:
void QmlCoapSecureClient::setSecurityConfiguration(const QString &localCertificatePath,
                                                   const QString &caCertificatePath,
                                                   const QString &privateKeyPath)
{
    QCoapSecurityConfiguration configuration;
    const auto localCerts =
            QSslCertificate::fromPath(QUrl(localCertificatePath).toLocalFile(), QSsl::Pem,
                                      QSslCertificate::PatternSyntax::FixedString);
    if (localCerts.isEmpty())
        qCWarning(lcCoapClient, "The specified local certificate file is not valid.");
    else
        configuration.setLocalCertificateChain(localCerts.toVector());
    const auto caCerts = QSslCertificate::fromPath(QUrl(caCertificatePath).toLocalFile(), QSsl::Pem,
                                                   QSslCertificate::PatternSyntax::FixedString);
    if (caCerts.isEmpty())
        qCWarning(lcCoapClient, "The specified CA certificate file is not valid.");
    else
        configuration.setCaCertificates(caCerts.toVector());
    QFile privateKey(QUrl(privateKeyPath).toLocalFile());
    if (privateKey.open(QIODevice::ReadOnly)) {
        QCoapPrivateKey key(privateKey.readAll(), QSsl::Ec);
        configuration.setPrivateKey(key);
    } else {
        qCWarning(lcCoapClient) << "Unable to read the specified private key file"
                                << privateKeyPath;
    }
    m_configuration = configuration;
}
After setting the security configuration, the
sendGetRequest
method sets the request URL and sends a
GET
请求:
void QmlCoapSecureClient::sendGetRequest(const QString &host, const QString &path, int port)
{
    if (!m_coapClient)
        return;
    m_coapClient->setSecurityConfiguration(m_configuration);
    QUrl url;
    url.setHost(host);
    url.setPath(path);
    url.setPort(port);
    m_coapClient->get(url);
}
When sending the first request, a handshake with the CoAP server is performed. After the handshake is successfully done, all the subsequent messages are encrypted, and changing the security configuration after a successful handshake won't have any effect. If you want to change it, or change the host, you need to disconnect first.
void QmlCoapSecureClient::disconnect()
{
    if (m_coapClient)
        m_coapClient->disconnect();
}
这将中止握手并关闭打开套接字。
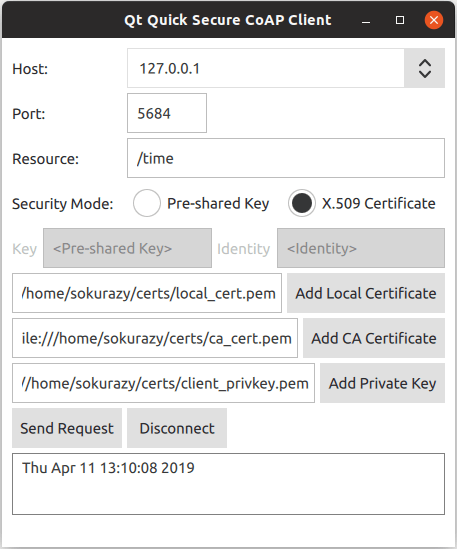
For the authentication using X.509 certificates, we need to specify the certificate files. The
FilePicker
component is used for this purpose. It combines a text field and a button for opening a file dialog when the button is pressed:
Item {
    id: filePicker
    property string dialogText
    property alias selectedFile: filePathField.text
    height: addFileButton.height
    FileDialog {
        id: fileDialog
        title: qsTr("Please Choose %1").arg(dialogText)
        folder: StandardPaths.writableLocation(StandardPaths.HomeLocation)
        fileMode: FileDialog.OpenFile
        onAccepted: filePathField.text = fileDialog.file
    }
    RowLayout {
        anchors.fill: parent
        TextField {
            id: filePathField
            placeholderText: qsTr("<%1>").arg(dialogText)
            inputMethodHints: Qt.ImhUrlCharactersOnly
            selectByMouse: true
            Layout.fillWidth: true
        }
        Button {
            id: addFileButton
            text: qsTr("Add %1").arg(dialogText)
            onClicked: fileDialog.open()
        }
    }
}
在
main.qml
file
FilePicker
is instantiated several times for creating input fields for certificates and the private key:
    ...
        FilePicker {
            id: localCertificatePicker
            dialogText: "Local Certificate"
            enabled: securityModeGroup.checkedButton === certificateMode
            Layout.columnSpan: 2
            Layout.fillWidth: true
        }
        FilePicker {
            id: caCertificatePicker
            dialogText: "CA Certificate"
            enabled: securityModeGroup.checkedButton === certificateMode
            Layout.columnSpan: 2
            Layout.fillWidth: true
        }
        FilePicker {
            id: privateKeyPicker
            dialogText: "Private Key"
            enabled: securityModeGroup.checkedButton === certificateMode
            Layout.columnSpan: 2
            Layout.fillWidth: true
        }
    ...
To run this example, you need to have a secure CoAP server supporting either PSK or Certificate modes (or both). You have the following options:
The following command pulls the docker container for a secure CoAP server based on Californium plugtest (which is not secure by default) from the Docker Hub and starts it:
docker run --name coap-test-server -d --rm -p 5683:5683/udp -p 5684:5684/udp sokurazy/coap-secure-test-server:californium.1.1.0
The CoAP test server will be reachable on ports 5683 (non-secure) and 5684 (secure). For instructions on retrieving the IP address see 获取 IP 地址 .
To run the example with this server, you need to set the pre-shared key to
secretPSK
and the identity to
Client_identity
.
The docker image of the secure server using authentication with X.509 certificates is based on the 时间服务器 example from the FreeCoAP library. The following command pulls the container from Docker Hub and starts it:
docker run --name coap-time-server -d --rm -p 5684:5684/udp sokurazy/coap-secure-time-sever:freecoap
For instructions on retrieving the IP address see
获取 IP 地址
. The CoAP test server will be reachable by the retrieved IP address on port
5684
and resource path
/time
.
To run the example with this server, you need to specify the certificate files required by the server. They are located in the docker container, under
/root/certs
directory. To copy them to a local directory, use the following command:
docker cp <container_id>:/root/certs <local_directory_path>
例如:
$ docker cp 5e46502df88f:/root/certs ~/
The instructions for getting the container ID are described below.
To find out the IP address of a docker container, first retrieve the container ID by running the
docker ps
command, which will output something like:
$ docker ps
CONTAINER ID        IMAGE
5e46502df88f        sokurazy/coap-secure-test-server:californium.1.1.0
Then you can obtain the IP address with the following command:
docker inspect <container_id> | grep IPAddress
例如:
$ docker inspect 5e46502df88f | grep IPAddress
...
"IPAddress": "172.17.0.2",
...
文件: