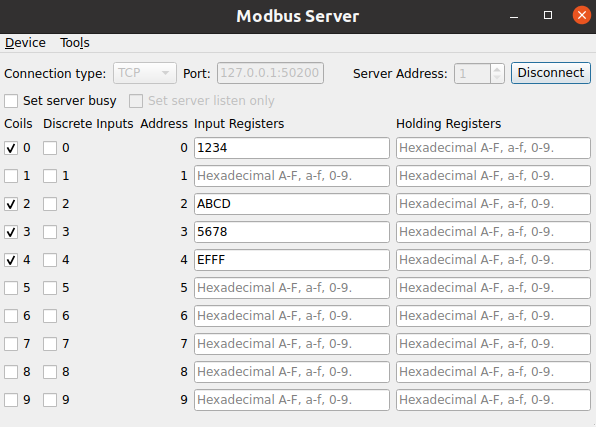
範例實現 Modbus 服務器應用程序。
The example acts as Modbus server. It receives standard Modbus requests, adjusts its internal states based on the request and responds with the appropriate reply.
This example must be used in conjunction with the Modbus 客戶端範例 . This example should be started and put into the listen state before the Modbus client example is started. Subsequent interactions between the two examples use the Modbus protocol.
範例中使用的關鍵類:
實例化的 QModbusServer is required to perform any communication. Depending on the specified connection type, the example can instantiate a QModbusRtuSerialServer (for serial communication) or a QModbusTcpServer (for TCP-based communication).
    auto type = static_cast<ModbusConnection>(index);
    if (type == Serial) {
#if QT_CONFIG(modbus_serialport)
        modbusDevice = new QModbusRtuSerialServer(this);
        // Try to fill in the first available serial port name if the line edit
        // is empty, or contains a url (assume that ':' is only a part of url).
        const auto ports = QSerialPortInfo::availablePorts();
        const auto currentText = ui->portEdit->text();
        if (!ports.isEmpty() && (currentText.isEmpty() || currentText.contains(u':')))
            ui->portEdit->setText(ports.front().portName());
#endif
    } else if (type == Tcp) {
        modbusDevice = new QModbusTcpServer(this);
        const QUrl currentUrl = QUrl::fromUserInput(ui->portEdit->text());
        // Check if we already have <ip address>:<port>
        if (currentUrl.port() <= 0)
            ui->portEdit->setText(QLatin1String("127.0.0.1:50200"));
    }
一旦服務器創建,就設置寄存器映射使用 QModbusServer::setMap () 方法。此寄存器映射用於客戶端應用程序讀寫服務器數據。
        QModbusDataUnitMap reg;
        reg.insert(QModbusDataUnit::Coils, { QModbusDataUnit::Coils, 0, 10 });
        reg.insert(QModbusDataUnit::DiscreteInputs, { QModbusDataUnit::DiscreteInputs, 0, 10 });
        reg.insert(QModbusDataUnit::InputRegisters, { QModbusDataUnit::InputRegisters, 0, 10 });
        reg.insert(QModbusDataUnit::HoldingRegisters, { QModbusDataUnit::HoldingRegisters, 0, 10 });
        modbusDevice->setMap(reg);
After that the communication parameters and the server address are specified. The communication parameters depend on the communication type:
        if (static_cast<ModbusConnection>(ui->connectType->currentIndex()) == Serial) {
            modbusDevice->setConnectionParameter(QModbusDevice::SerialPortNameParameter,
                ui->portEdit->text());
#if QT_CONFIG(modbus_serialport)
            modbusDevice->setConnectionParameter(QModbusDevice::SerialParityParameter,
                m_settingsDialog->settings().parity);
            modbusDevice->setConnectionParameter(QModbusDevice::SerialBaudRateParameter,
                m_settingsDialog->settings().baud);
            modbusDevice->setConnectionParameter(QModbusDevice::SerialDataBitsParameter,
                m_settingsDialog->settings().dataBits);
            modbusDevice->setConnectionParameter(QModbusDevice::SerialStopBitsParameter,
                m_settingsDialog->settings().stopBits);
#endif
        } else {
            const QUrl url = QUrl::fromUserInput(ui->portEdit->text());
            modbusDevice->setConnectionParameter(QModbusDevice::NetworkPortParameter, url.port());
            modbusDevice->setConnectionParameter(QModbusDevice::NetworkAddressParameter, url.host());
        }
        modbusDevice->setServerAddress(ui->serverEdit->text().toInt());
After the server is created and all the parameters are specified, use QModbusServer::connectDevice () to connect to Modbus network.
The example allows to change values of all supported register types by using the provided combo boxes or line edits. Once the value is updated in the UI, the QModbusServer::setData () method is used to update the actual value on the server:
void MainWindow::bitChanged(int id, QModbusDataUnit::RegisterType table, bool value)
{
    if (!modbusDevice)
        return;
    if (!modbusDevice->setData(table, quint16(id), value))
        statusBar()->showMessage(tr("Could not set data: ") + modbusDevice->errorString(), 5000);
}
void MainWindow::setRegister(const QString &value)
{
    if (!modbusDevice)
        return;
    const QString objectName = QObject::sender()->objectName();
    if (registers.contains(objectName)) {
        bool ok = true;
        const quint16 id = quint16(QObject::sender()->property("ID").toUInt());
        if (objectName.startsWith(QStringLiteral("inReg"))) {
            const auto uval = value.toUShort(&ok, 16);
            if (ok)
                ok = modbusDevice->setData(QModbusDataUnit::InputRegisters, id, uval);
        } else if (objectName.startsWith(QStringLiteral("holdReg"))) {
            const auto uval = value.toUShort(&ok, 16);
            if (ok)
                ok = modbusDevice->setData(QModbusDataUnit::HoldingRegisters, id, uval);
        }
        if (!ok)
            statusBar()->showMessage(tr("Could not set register: ") + modbusDevice->errorString(),
                                     5000);
    }
}
The Modbus clients are capable of updating 綫圈 and HoldingRegisters by sending write requests. Once the value is updated on the server side using such request, a QModbusServer::dataWritten () 信號發射。
        connect(modbusDevice, &QModbusServer::dataWritten,
                this, &MainWindow::updateWidgets);
The Modbus server example connects to this signal, extracts the updated values and updates the UI accordingly:
void MainWindow::updateWidgets(QModbusDataUnit::RegisterType table, int address, int size)
{
    for (int i = 0; i < size; ++i) {
        quint16 value;
        QString text;
        switch (table) {
        case QModbusDataUnit::Coils:
            modbusDevice->data(QModbusDataUnit::Coils, quint16(address + i), &value);
            coilButtons.button(address + i)->setChecked(value);
            break;
        case QModbusDataUnit::HoldingRegisters:
            modbusDevice->data(QModbusDataUnit::HoldingRegisters, quint16(address + i), &value);
            registers.value(QStringLiteral("holdReg_%1").arg(address + i))->setText(text
                .setNum(value, 16));
            break;
        default:
            break;
        }
    }
}
要運行範例從 Qt Creator ,打開 歡迎 模式,然後選擇範例從 範例 。更多信息,見 Qt Creator:教程:構建並運行 .