Demonstrates how to use LayoutItemProxy to make a responsive UI.
This example shows how to use LayoutProxyItems in combination with layouts to create responsive layouts.
要运行范例从 Qt Creator ,打开 Welcome 模式,然后选择范例从 Examples 。更多信息,拜访 构建和运行范例 .
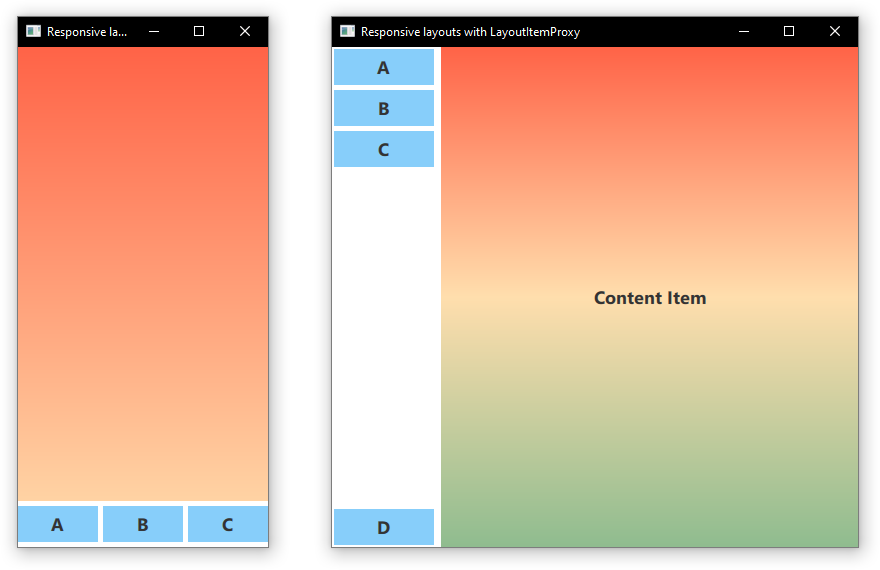
The LayoutItemProxy type allows to use the same item in different layouts, although only one layout can be visible at the same time. This can be used to create responsive layouts that adapt to the window or screen size.
First we need to define all items that should appear in or UI at some point. We use a AnnotatedRect, which is a simple Rectangle with some added text.
AnnotatedRect {
    id: contentItem
    text: "Content Item"
    Layout.fillWidth: true
    implicitHeight: 1000
    implicitWidth: 500
    gradient: Gradient {
        GradientStop { position: 0.0; color: "tomato" }
        GradientStop { position: 0.5; color: "navajowhite" }
        GradientStop { position: 1.0; color: "darkseagreen" }
    }
}
AnnotatedRect {
    id: a
    text: "A"
    color: "lightskyblue"
    Layout.fillWidth: true
}
AnnotatedRect {
    id: b
    text: "B"
    color: "lightskyblue"
    Layout.fillWidth: true
}
AnnotatedRect {
    id: c
    text: "C"
    color: "lightskyblue"
    Layout.fillWidth: true
}
AnnotatedRect {
    id: d
    text: "D"
    color: "lightskyblue"
    Layout.fillWidth: true
}
We can now declare various layouts using LayoutItemProxies , targeting the previously declare items. A single layout can be defined as follows.
ColumnLayout {
    id: smallLayout
    anchors.fill: parent
    Flickable {
        Layout.fillHeight: true
        Layout.fillWidth: true
        contentWidth: width
        contentHeight: gl.implicitHeight
        clip: true
        ScrollIndicator.vertical: ScrollIndicator { }
        LayoutItemProxy {
            id: gl
            width: parent.width
            height: implicitHeight
            target: contentItem
        }
    }
    RowLayout {
        Layout.fillHeight: false
        Layout.fillWidth: true
        LayoutItemProxy{ target: a; Layout.bottomMargin: 5 }
        LayoutItemProxy{ target: b; Layout.bottomMargin: 5 }
        LayoutItemProxy{ target: c; Layout.bottomMargin: 5 }
    }
}
This snippet shows multiple ways to use the
LayoutItemProxy
. The simplest method is to add
LayoutItemProxies
to a Layout like the
RowLayout
here. In addition we set an additional
Layout
attached property to the LayoutProxyItem that will affect the target item only in this particular layout. Further, we see that the item
d
is not used in the first layout. Then it is automatically hidden by the
LayoutItemProxy
in the second layout. Another way of using it is shown by setting a
LayoutItemProxy
as the content of a
Flickable
.
Another layout is declared as follows.
RowLayout {
    id: largeLayout
    anchors.fill: parent
    ColumnLayout {
        Layout.minimumWidth: 100
        Layout.margins: 2
        LayoutItemProxy{ target: a }
        LayoutItemProxy{ target: b }
        LayoutItemProxy{ target: c }
        Item { Layout.fillHeight: true }
        LayoutItemProxy{ target: d }
    }
    LayoutItemProxy {
        Layout.fillHeight: true
        target: contentItem
    }
}
Here we show that LayoutItemProxies can be used together with real Items on the same hierarchy level. Generally, the LayoutItemProxy is flexible and allows nested structures of items and layouts.
After two layouts,
smallLayout
and
largeLayout
are defined, we can continue with setting the layout that fits to the current size of the application. We define a new function for this code that we call when the window is initialized and whenever the width changes:
function setFittingLayout() {
    if (width < 450) {
        smallLayout.visible = true
        largeLayout.visible = false
    } else {
        smallLayout.visible = false
        largeLayout.visible = true
    }
}
onWidthChanged: setFittingLayout()
Component.onCompleted: setFittingLayout()
Alternatively to calling this function after initialization we can hide all but the correct layout for the initial size in the declarative code.