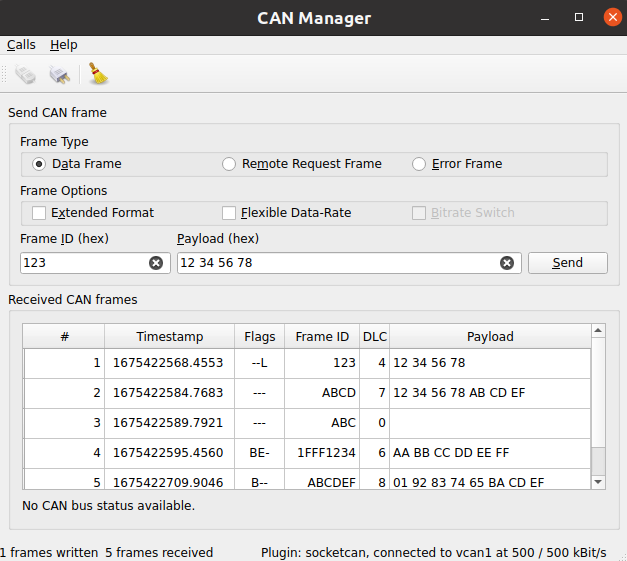
範例發送/接收 CAN Bus 幀。
範例發送/接收 CAN Bus 幀。傳入幀根據其類型進行排序。提供調節 CAN Bus 連接參數的連接對話框。
Key Qt Serial Bus 類被用於此範例:
實例化的 QCanBusDevice is required to perform any CAN communication.
The
ConnectDialog
allows to specify all the required parameters. After that the device is created using the provided plugin and interface names:
    QString errorString;
    m_canDevice.reset(QCanBus::instance()->createDevice(p.pluginName, p.deviceInterfaceName,
                                                        &errorString));
    connect(m_canDevice.get(), &QCanBusDevice::errorOccurred,
            this, &MainWindow::processErrors);
    connect(m_canDevice.get(), &QCanBusDevice::framesReceived,
            this, &MainWindow::processReceivedFrames);
    connect(m_canDevice.get(), &QCanBusDevice::framesWritten,
            this, &MainWindow::processFramesWritten);
The established connections allow to process incoming frames, control the sent frames and handle errors.
When the device is created, use QCanBusDevice::connectDevice () to start the communication.
QCanBusDevice 發射 framesReceived () signal when new frames are available. The readFrame () method can be used to read a single QCanBusFrame while there are available frames . Once the frame is received, individual parameters such as frameId , timeStamp ,或 payload can be extracted from it:
    while (m_canDevice->framesAvailable()) {
        m_numberFramesReceived++;
        const QCanBusFrame frame = m_canDevice->readFrame();
        QString data;
        if (frame.frameType() == QCanBusFrame::ErrorFrame)
            data = m_canDevice->interpretErrorFrame(frame);
        else
            data = QString::fromLatin1(frame.payload().toHex(' ').toUpper());
        const QString time = QString::fromLatin1("%1.%2  ")
                .arg(frame.timeStamp().seconds(), 10, 10, ' '_L1)
                .arg(frame.timeStamp().microSeconds() / 100, 4, 10, '0'_L1);
        const QString flags = frameFlags(frame);
        const QString id = QString::number(frame.frameId(), 16).toUpper();
        const QString dlc = QString::number(frame.payload().size());
        m_model->appendFrame(QStringList({QString::number(m_numberFramesReceived),
                                          time, flags, id, dlc, data}));
    }
To send custom data over the CAN bus, the user needs to provide at least a frameId 和 payload . Optionally other QCanBusFrame parameters can be configured:
    const uint frameId = m_ui->frameIdEdit->text().toUInt(nullptr, 16);
    QString data = m_ui->payloadEdit->text();
    m_ui->payloadEdit->setText(formatHexData(data));
    const QByteArray payload = QByteArray::fromHex(data.remove(u' ').toLatin1());
    QCanBusFrame frame = QCanBusFrame(frameId, payload);
    frame.setExtendedFrameFormat(m_ui->extendedFormatBox->isChecked());
    frame.setFlexibleDataRateFormat(m_ui->flexibleDataRateBox->isChecked());
    frame.setBitrateSwitch(m_ui->bitrateSwitchBox->isChecked());
    if (m_ui->errorFrame->isChecked())
        frame.setFrameType(QCanBusFrame::ErrorFrame);
    else if (m_ui->remoteFrame->isChecked())
        frame.setFrameType(QCanBusFrame::RemoteRequestFrame);
Once the frame is prepared, the QCanBusDevice::writeFrame () method can be used to send it:
m_canDevice->writeFrame(frame);
要運行範例從 Qt Creator ,打開 Welcome 模式,然後選擇範例從 Examples 。更多信息,拜訪 構建和運行範例 .