演示如何将 HTML5 Web 通知传递给用户。
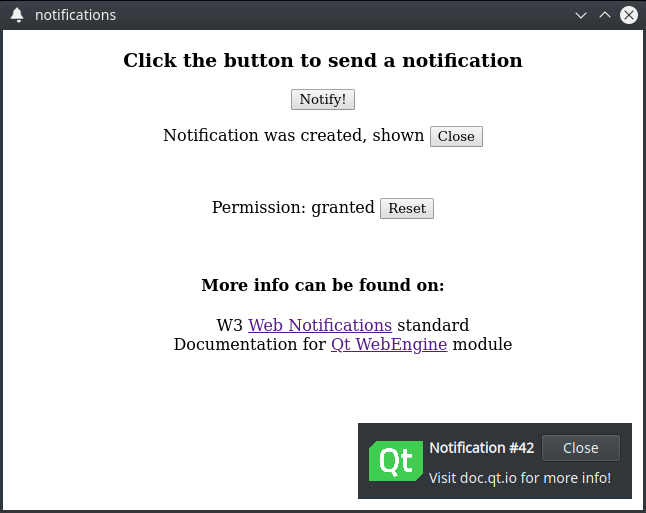
WebEngine 通知 演示如何使用 QWebEngineProfile::setNotificationPresenter () 方法和 QWebEngineNotification 类去向用户展示 HTML5 Web 通知。
要运行范例从 Qt Creator ,打开 欢迎 模式,然后选择范例从 范例 。更多信息,拜访 构建和运行范例 .
In this example, we create an internal HTML page that is added through a resource collection file (.qrc). The page displays buttons for requesting permissions and contains necessary JavaScript code to trigger this request:
            Notification.requestPermission().then(function (permission) {
                if (permission == 'granted')
                    createNotification()
            })
Also page contains a button for creating a notification. The following JavaScript constructions are executed on the press event:
    function createNotification() {
        let title = 'Notification #' + ++notificationsCreated
        let options = { body: 'Visit doc.qt.io for more info!', icon: 'icon.png', }
        let notification = new Notification(title, options)
    }
在
main
函数,实例化
QWebEngineView
, load our internal HTML page, and set up the required callbacks for notifications handling.
We then use the QWebEnginePage::featurePermissionRequested () call to request the user's permission to show notifications on their device.
    QObject::connect(view.page(), &QWebEnginePage::featurePermissionRequested,
                     [&] (const QUrl &origin, QWebEnginePage::Feature feature) {
                         if (feature != QWebEnginePage::Notifications)
                             return;
                         view.page()->setFeaturePermission(origin, feature, QWebEnginePage::PermissionGrantedByUser);
                     });
We then construct a
NotificationPopup
that encapsulates the data of the HTML web notification. We also use the
QWebEngineProfile::setNotificationPresenter
() call to set our handler, which we use in conjunction with our
popup
to handle all new notifications.
    auto popup = new NotificationPopup(&view);
    profile->setNotificationPresenter([&] (std::unique_ptr<QWebEngineNotification> notification)
                                      { popup->present(notification); });
NotificationPopup
class in this example is a simple
QWidget
-based class that uses multiple
QLabel
instances for displaying the notification's title, message, and icon.
class NotificationPopup : public QWidget
{
    Q_OBJECT
    QLabel m_icon, m_title, m_message;
    std::unique_ptr<QWebEngineNotification> notification;
Inside the
present
method, we first close and release the previous notification if we have one and then take ownership of a new notification by calling the
std::unique_ptr::swap
method on our internal notification instance.
    void present(std::unique_ptr<QWebEngineNotification> &newNotification)
    {
        if (notification) {
            notification->close();
            notification.reset();
        }
        notification.swap(newNotification);
Then we query the notification instance for a title, a message, and an icon by calling QWebEngineNotification::title (), QWebEngineNotification::message (), QWebEngineNotification::icon () and set up the appropriate labels in our popup.
        m_title.setText("<b>" + notification->title() + "</b>");
        m_message.setText(notification->message());
        m_icon.setPixmap(QPixmap::fromImage(notification->icon()).scaledToHeight(m_icon.height()));
After that we are ready to display our notification to the user by calling the
QWidget::show
() method. On this step we also call the
QWebEngineNotification::show
() method to notify
JavaScript
code about our
show
事件。
        show();
        notification->show();
Finally, we set up a callback to handle the
close
event from the
JavaScript
side by connecting to the
QWebEngineNotification::closed
() signal. We also schedule a timer event to close our active notification automatically.
        connect(notification.get(), &QWebEngineNotification::closed, this, &NotificationPopup::onClosed);
        QTimer::singleShot(10000, notification.get(), [&] () { onClosed(); });
    }
We execute the
close
step for the currently active notification either by timeout or by handling the
JavaScript
event. First, we hide the popup widget itself by calling
QWidget::hide
(). Then, we notify the
JavaScript
code by calling the
QWebEngineNotification::close
() method. Finally, we destroy the notification object through the
std::unique_ptr::reset()
方法。
    void onClosed()
    {
        hide();
        notification->close();
        notification.reset();
    }
To implement the
click
step for a notification, we handle mouse interaction through
QWidget::mouseReleaseEvent
(). On this event, the
JavaScript
code is notified by calling the
QWebEngineNotification::click
() method. Then we automatically perform the
close
step as a notification is considered fully handled and no longer needed, and therefore can be destroyed.
    void mouseReleaseEvent(QMouseEvent *event) override
    {
        QWidget::mouseReleaseEvent(event);
        if (notification && event->button() == Qt::LeftButton) {
            notification->click();
            onClosed();
        }
    }