The Qt Quick for Android API examples are provided as Android Studio projects. The project folders are found in your Qt install location.
For example, under the default Windows install path, they are found here:
C:\Qt\Examples\Qt-<patch-release-number>\platforms\android\<example-name>
These projects are already configured to use a version of the Qt Gradle Plugin compatible with this Qt version.
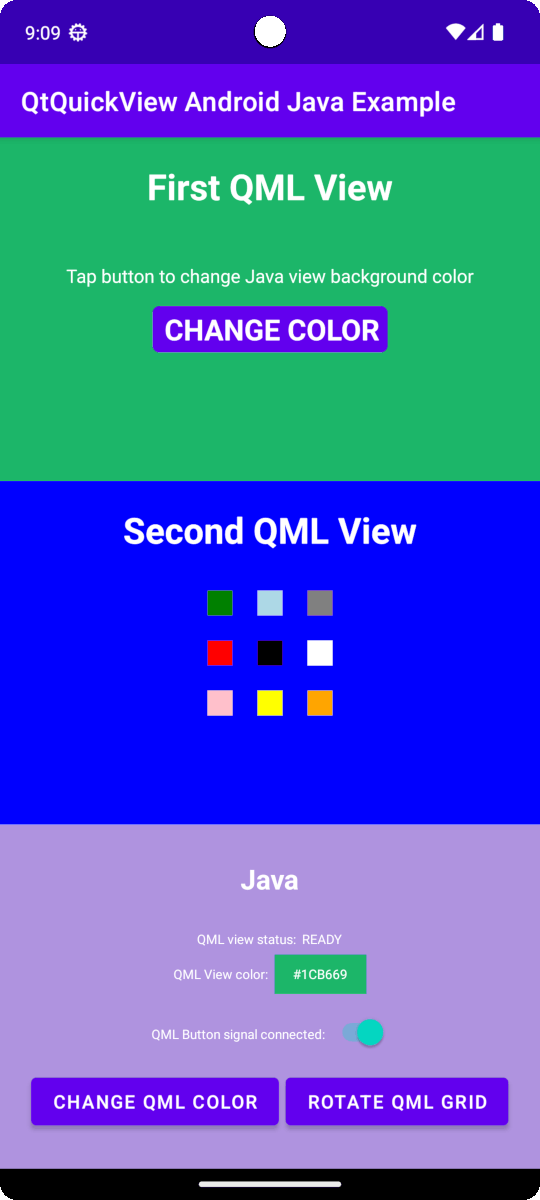
This example contains a QML project you can import into Android Studio with the Qt Tools for Android Studio plugin. There are Java and Kotlin projects that use the QML project as a View by utilizing the QtQuickView API.
For more information on how QML works, see Qt QML . This documentation focuses on how a QML component is embedded into Android Applications using Java or Kotlin.
main()
are required by Qt Quick for Android APIs
A typical Qt Quick application's main.cpp appears like this:
#include <QGuiApplication>
#include <QQmlApplicationEngine>
int main(int argc, char *argv[])
{
    QGuiApplication app(argc, argv);
    QQmlApplicationEngine engine;
    QObject::connect(
        &engine,
        &QQmlApplicationEngine::objectCreationFailed,
        &app,
        []() { QCoreApplication::exit(-1); },
        Qt::QueuedConnection);
    engine.loadFromModule("MyQtQuickProject", "Main");
    return app.exec();
}
在
main()
we don't need to create a QML Engine or load any QML that will be handled later by the Qt Quick View APIs. All that we need is in
main()
is:
#include <QGuiApplication>
int main(int argc, char *argv[])
{
    QGuiApplication app(argc, argv);
    return app.exec();
}
For both Java and Kotlin projects, we need to set up the layout for the
QtQuickView
s in
app/src/main/res/layout/activity_main.xml
.
Inside the
LinearLayout
, we set up two FrameLayouts for each
QtQuickView
.
 <FrameLayout
    android:id="@+id/firstQmlFrame"
    android:layout_width="match_parent"
    android:layout_height="0dp"
    android:layout_weight="1">
</FrameLayout>
<FrameLayout
    android:id="@+id/secondQmlFrame"
    android:layout_width="match_parent"
    android:layout_height="0dp"
    android:layout_weight="1">
</FrameLayout>
The
id
is what is referred to in the Kotlin or Java-coded MainActivity.
The Java classes for our QML types are generated when the Qt Quick project is built. These must be imported before we can use them in our MainActivity.
import org.qtproject.example.qtquickview.QmlModule.Main;
import org.qtproject.example.qtquickview.QmlModule.Second;
import org.qtproject.example.qtquickview.QmlModule.Main
import org.qtproject.example.qtquickview.QmlModule.Second
注意: 见 QT_ANDROID_GENERATE_JAVA_QTQUICKVIEW_CONTENTS CMake variable for further information on Java code generation of QML components.
First, we look at the
MainActivity
's onCreate() method of the Java and Kotlin projects.
@Override
protected void onCreate(Bundle savedInstanceState) {
    super.onCreate(savedInstanceState);
    setContentView(R.layout.activity_main);
    m_qmlViewBackgroundText = findViewById(R.id.qmlViewBackgroundText);
    m_qmlStatus = findViewById(R.id.qmlStatusText);
    m_androidControlsLayout = findViewById(R.id.javaRelative);
    m_colorBox = findViewById(R.id.qmlColorBox);
    m_switch = findViewById(R.id.disconnectQmlListenerSwitch);
    m_switch.setOnClickListener(view -> switchListener());
    QtQuickView m_firstQuickView = new QtQuickView(this);
    QtQuickView m_secondQuickView = new QtQuickView(this);
    // Set status change listener for m_qmlView
    // listener implemented below in OnStatusChanged
    m_firstQmlContent.setStatusChangeListener(this);
    m_secondQmlContent.setStatusChangeListener(this);
    final ViewGroup.LayoutParams params = new FrameLayout.LayoutParams(
            ViewGroup.LayoutParams.MATCH_PARENT, ViewGroup.LayoutParams.MATCH_PARENT);
    FrameLayout m_firstQmlFrameLayout = findViewById(R.id.firstQmlFrame);
    m_firstQmlFrameLayout.addView(m_firstQuickView, params);
    FrameLayout m_secondQmlFrameLayout = findViewById(R.id.secondQmlFrame);
    m_secondQmlFrameLayout.addView(m_secondQuickView, params);
    m_firstQuickView.loadContent(m_firstQmlContent);
    m_secondQuickView.loadContent(m_secondQmlContent);
    Button m_changeColorButton = findViewById(R.id.changeQmlColorButton);
    m_changeColorButton.setOnClickListener(view -> onClickListener());
    Button m_rotateQmlGridButton = findViewById(R.id.rotateQmlGridButton);
    m_rotateQmlGridButton.setOnClickListener(view -> rotateQmlGrid());
}
override fun onCreate(savedInstanceState: Bundle?) {
    super.onCreate(savedInstanceState)
    m_binding = ActivityMainBinding.inflate(layoutInflater)
    val view = m_binding.root
    setContentView(view)
    m_binding.disconnectQmlListenerSwitch.setOnCheckedChangeListener { button, checked ->
        switchListener(
            button,
            checked
        )
    }
    val firstQtQuickView = QtQuickView(this)
    val secondQtQuickView = QtQuickView(this)
    // Set status change listener for m_qmlView
    // listener implemented below in OnStatusChanged
    m_firstQmlContent.setStatusChangeListener(this)
    m_secondQmlContent.setStatusChangeListener(this)
    val params: ViewGroup.LayoutParams = FrameLayout.LayoutParams(
        ViewGroup.LayoutParams.MATCH_PARENT, ViewGroup.LayoutParams.MATCH_PARENT
    )
    m_binding.firstQmlFrame.addView(firstQtQuickView, params)
    m_binding.secondQmlFrame.addView(secondQtQuickView, params)
    firstQtQuickView.loadContent(m_firstQmlContent)
    secondQtQuickView.loadContent(m_secondQmlContent)
    m_binding.changeQmlColorButton.setOnClickListener { onClickListener() }
    m_binding.rotateQmlGridButton.setOnClickListener { rotateQmlGrid() }
}
注意: in the Kotlin project we use View binding to access the UI components of the application:
m_binding = ActivityMainBinding.inflate(layoutInflater)
val view = m_binding.root
setContentView(view)
Inside the
onCreate()
method, previously declared variables are initialized with new
QtQuickView
instances. These instances take the
Context
of the Java/Kotlin Activity as arguments.
QtQuickView m_firstQuickView = new QtQuickView(this);
QtQuickView m_secondQuickView = new QtQuickView(this);
val firstQtQuickView = QtQuickView(this)
val secondQtQuickView = QtQuickView(this)
The QtQuickView instances are added to the Android layout with appropriate layout parameters.
final ViewGroup.LayoutParams params = new FrameLayout.LayoutParams(
        ViewGroup.LayoutParams.MATCH_PARENT, ViewGroup.LayoutParams.MATCH_PARENT);
FrameLayout m_firstQmlFrameLayout = findViewById(R.id.firstQmlFrame);
m_firstQmlFrameLayout.addView(m_firstQuickView, params);
FrameLayout m_secondQmlFrameLayout = findViewById(R.id.secondQmlFrame);
m_secondQmlFrameLayout.addView(m_secondQuickView, params);
val params: ViewGroup.LayoutParams = FrameLayout.LayoutParams(
    ViewGroup.LayoutParams.MATCH_PARENT, ViewGroup.LayoutParams.MATCH_PARENT
)
m_binding.firstQmlFrame.addView(firstQtQuickView, params)
m_binding.secondQmlFrame.addView(secondQtQuickView, params)
The
Main
and
Second
Java classes inherit from the
QtQuickViewContent
class. These classes are generated from the QML project that we've imported.
private final Main m_firstQmlContent = new Main();
private final Second m_secondQmlContent = new Second();
private val m_firstQmlContent: Main = Main()
private val m_secondQmlContent: Second = Second()
The Qt Quick content is loaded through the
QtQuickView.loadContent()
method, which takes a
QtQuickViewContent
作为自变量。
m_firstQuickView.loadContent(m_firstQmlContent);
m_secondQuickView.loadContent(m_secondQmlContent);
firstQtQuickView.loadContent(m_firstQmlContent)
secondQtQuickView.loadContent(m_secondQmlContent)
To interact with the embedded QML components we implement the
QtQmlStatusChangeListener
interface and override the
onStatusChanged
method to get the loading status of the
QtQuickViewContent
currently being loaded into the
QtQuickView
.
public class MainActivity extends AppCompatActivity implements
QtQmlStatusChangeListener {
    ...
}
class MainActivity : AppCompatActivity(), QtQmlStatusChangeListener {
    ...
}
The
onStatusChanged
implementation:
@Override
public void onStatusChanged(QtQmlStatus qtQmlStatus, QtQuickViewContent content) {
    Log.i(TAG, "Status of QtQuickView: " + qtQmlStatus);
    // Show current QML View status in a textview
    m_qmlStatus.setText(getString(R.string.qml_view_status, m_statusNames.get(qtQmlStatus)));
    updateColorDisplay();
    if (content == m_firstQmlContent) {
        // Connect signal listener to "onClicked" signal from main.qml
        // addSignalListener returns int which can be used later to identify the listener
        if (qtQmlStatus == QtQmlStatus.READY && m_switch.isChecked()) {
            m_qmlButtonSignalListenerId = m_firstQmlContent.connectOnClickedListener(
                    (String name, Void v) -> {
                        Log.i(TAG, "QML button clicked");
                        m_androidControlsLayout.setBackgroundColor(Color.parseColor(
                                m_colors.getColor()
                        ));
                    });
        }
    }
}
override fun onStatusChanged(status: QtQmlStatus?, content: QtQuickViewContent?) {
    Log.v(TAG, "Status of QtQuickView: $status")
    // Show current QML View status in a textview
    m_binding.qmlStatusText.text = getString(R.string.qml_view_status, m_statusNames[status])
    updateColorDisplay()
    if (content == m_firstQmlContent) {
        // Connect signal listener to "onClicked" signal from main.qml
        // addSignalListener returns int which can be used later to identify the listener
        if (status == QtQmlStatus.READY && m_binding.disconnectQmlListenerSwitch.isChecked) {
            m_qmlButtonSignalListenerId =
                m_firstQmlContent.connectOnClickedListener { _: String, _: Void? ->
                    Log.i(TAG, "QML button clicked")
                    m_binding.kotlinRelative.setBackgroundColor(
                        Color.parseColor(
                            m_colors.getColor()
                        )
                    )
                }
        }
    }
}
The
MainActivity
is set as the
statusChangeListener
的
m_mainQmlContent
and
m_secondQmlContent
采用
QtQuickViewContent.setStatusChangeListener
方法。
m_firstQmlContent.setStatusChangeListener(this);
m_secondQmlContent.setStatusChangeListener(this);
m_firstQmlContent.setStatusChangeListener(this)
m_secondQmlContent.setStatusChangeListener(this)
The overridden callback function
onStatusChanged()
receives
StatusChanged()
signal containing the current status, a
QtQmlStatus
Enum, of the loading of the current
QtQuickViewContent
到
QtQuickView
. If this
QtQmlStatus
is confirmed to be
QtQmlStatus.READY
, we can start interacting with the QML view.
Getting and setting QML component property values happens through the methods described in the
Main.java
class. In this case we use the
m_mainQmlContent.setColorStringProperty()
and
m_mainQmlContent.getColorStringProperty()
methods. These methods are generated according to what properties the QML component includes.
public void onClickListener() {
    // Set the QML view root object property "colorStringFormat" value to
    // color from Colors.getColor()
    m_firstQmlContent.setColorStringFormat(m_colors.getColor());
    updateColorDisplay();
}
private void updateColorDisplay() {
    String qmlBackgroundColor = m_firstQmlContent.getColorStringFormat();
    // Display the QML View background color code
    m_qmlViewBackgroundText.setText(qmlBackgroundColor);
    // Display the QML View background color in a view
    // if qmlBackGroundColor is not null
    if (qmlBackgroundColor != null) {
        m_colorBox.setBackgroundColor(Color.parseColor(qmlBackgroundColor));
    }
}
private fun onClickListener() {
    // Set the QML view root object property "colorStringFormat" value to
    // color from Colors.getColor()
    m_firstQmlContent.colorStringFormat = m_colors.getColor()
    updateColorDisplay()
}
private fun updateColorDisplay() {
    val qmlBackgroundColor = m_firstQmlContent.colorStringFormat
    // Display the QML View background color code
    m_binding.qmlViewBackgroundText.text = qmlBackgroundColor
    // Display the QML View background color in a view
    // if qmlBackgroundColor is not null
    if (qmlBackgroundColor != null) {
        m_binding.qmlColorBox.setBackgroundColor(Color.parseColor(qmlBackgroundColor))
    }
}
With the
m_mainQmlContent.setColorStringProperty()
method we set the
colorStringFormat
property value of the
m_mainQmlContent
a random color value that is fetched from the
Colors.java
(或
Colors.kt
) class.
The
m_mainQmlContent.getColorStringProperty()
method is used here to fetch the current background color of the root object of the m_mainQmlContent and then show it to the user on the Java/Kotlin Android side of the application.
m_secondQmlContent
拥有
Grid
QML component which we can rotate from the Java side with the generated
m_secondQmlContent.setGridRotation()
方法。
private void rotateQmlGrid() {
    Integer previousGridRotation = m_secondQmlContent.getGridRotation();
    if (previousGridRotation != null) {
        m_secondQmlContent.setGridRotation(previousGridRotation + 45);
    }
}
private fun rotateQmlGrid() {
    val previousGridRotation = m_secondQmlContent.gridRotation
    if (previousGridRotation != null) {
        m_secondQmlContent.gridRotation = previousGridRotation + 45
    }
}
The
QtQuickViewContent
class offers a
connectSignalListener()
and
disconnectSignalListener()
methods which are used to connect and disconnect signal listeners between signals that are declared in the QML component root object. The
QtQuickViewContent.connectSignalListener()
returns a unique signal listener ID, which we store and use later to identify and disconnect the listener.
Here we connect a signal listener to the
onClicked()
signal of the QML component:
if (qtQmlStatus == QtQmlStatus.READY && m_switch.isChecked()) {
    m_qmlButtonSignalListenerId = m_firstQmlContent.connectOnClickedListener(
            (String name, Void v) -> {
                Log.i(TAG, "QML button clicked");
                m_androidControlsLayout.setBackgroundColor(Color.parseColor(
                        m_colors.getColor()
                ));
            });
}
if (status == QtQmlStatus.READY && m_binding.disconnectQmlListenerSwitch.isChecked) {
    m_qmlButtonSignalListenerId =
        m_firstQmlContent.connectOnClickedListener { _: String, _: Void? ->
            Log.i(TAG, "QML button clicked")
            m_binding.kotlinRelative.setBackgroundColor(
                Color.parseColor(
                    m_colors.getColor()
                )
            )
        }
}
The
onClicked()
signal is emitted every time the button on the QML component is clicked. This listener then receives that signal, and the background color of the layout holding the Android side of the application is set to a random color value fetched from the
Colors.java
类。
Next, the signal listener is disconnected using the
QtQuickViewContent.disconnectSignalListener()
method by giving it the unique signal listener ID.
m_firstQmlContent.disconnectSignalListener(m_qmlButtonSignalListenerId);
m_firstQmlContent.disconnectSignalListener(m_qmlButtonSignalListenerId)
If you haven't already, check out the Qt Academy: Embedding Qt Quick 3D Content in an Android App course that introduces the tools and APIs referenced in this example.